Hey there, fellow website builders and aspiring digital strategists! Noah Evans here, your guide from AskByteWise.com, where our mission is to make complex tech simple. Today, we’re tackling a topic that often sounds intimidating but is absolutely crucial for your website’s success: How to Perform a Basic SEO Audit on Your Website. Think of it as a routine check-up for your website, ensuring it’s in top shape to be found by your audience on search engines like Google. This comprehensive guide will walk you through each step, making sure you have a clear, actionable plan to identify and fix common SEO issues, ultimately helping your site rank higher and attract more visitors. Let’s dive in and demystify the process together!
Before You Begin: Getting Your Tools Ready
Before we roll up our sleeves and start digging, let’s make sure you have everything you need. This isn’t brain surgery, but a few tools and access points will make our SEO audit much smoother.
- Admin Access to Your Website: This is non-negotiable. You’ll need full administrator privileges for your WordPress site or equivalent access if you’re using another CMS. This includes access to your hosting control panel (
cPanel,Plesk, etc.) if you need to edit files like.htaccessorphp.ini. - Google Search Console Account: If you haven’t set this up yet, pause right now and do it. It’s Google’s direct line of communication with your website, providing invaluable insights into how your site performs in search, indexing status, and any crawl errors.
- Google Analytics Account: This will help us understand user behavior on your site – how long they stay, what pages they visit, and where they leave. It complements Search Console beautifully.
- An SEO Plugin (Recommended for WordPress): For WordPress users, a robust SEO plugin like Yoast SEO or Rank Math is a game-changer. These tools simplify many on-page SEO tasks and provide crucial insights directly within your dashboard.
- A Browser: Google Chrome is excellent for its developer tools, which can help with quick checks.
- A Spreadsheet: A simple Google Sheet or Excel file will be your best friend for tracking issues and changes.
- A Fresh Cup of Coffee (or Tea!): This is a detailed process, so let’s stay focused and hydrated!
With these essentials in hand, you’re ready to learn how to perform a basic SEO audit on your website.
Step 1: Check Your Website’s Indexability – Can Google Even See You?
The very first step in any SEO audit is to ensure search engines can actually find and “read” your website. If Google can’t crawl and index your pages, all your other SEO efforts are in vain.
Verify Google Search Console Setup
- Access Google Search Console: Log into your Google Search Console account.
- Check for Errors: In the left-hand menu, navigate to Index > Coverage. Look for any “Error” or “Valid with warning” messages. These could indicate serious problems preventing your pages from being indexed. Common errors include “Submitted URL marked ‘noindex'” or “Soft 404s.”
- Inspect URLs: Use the “URL Inspection” tool at the top of the Search Console interface. Enter a few key URLs from your site. This will tell you if the page is indexed, if it has any issues, and when it was last crawled.
Best Practice: Regularly check your Search Console. It’s your early warning system for indexing issues. If you see a sudden drop in indexed pages or an increase in errors, investigate immediately.
Review robots.txt File
Your robots.txt file is like a traffic cop for search engine bots. It tells them which parts of your site they can and cannot crawl. A misconfigured robots.txt can accidentally block your entire site from search engines!
-
Locate
robots.txt: Open your web browser and typeyourdomain.com/robots.txt(replaceyourdomain.comwith your actual domain). -
Examine Contents: Look for
Disallow: /. If you see this on a line by itself, it means you’re blocking all bots from your entire site. This is a common beginner mistake!- You might see
Disallow: /wp-admin/orDisallow: /wp-content/plugins/which are usually good, as they prevent bots from wasting crawl budget on non-essential areas. - Ensure there’s no
Disallow:rule blocking important pages or entire sections of your public website.
User-agent: * Allow: / # Disallow access to the WordPress admin and core files Disallow: /wp-admin/ Disallow: /wp-includes/ # And so on for other non-public areas Sitemap: https://yourdomain.com/sitemap_index.xml - You might see
-
Test in Search Console: Go to Settings > Crawl stats in Google Search Console, or use the
robots.txtTester if available in older interfaces.
Submit Your XML Sitemap
An XML sitemap is a list of all the important pages on your website that you want search engines to crawl and index. It acts as a roadmap for bots.
- Find Your Sitemap: Most WordPress SEO plugins (like Yoast SEO or Rank Math) automatically generate an XML sitemap. It’s usually found at
yourdomain.com/sitemap_index.xmloryourdomain.com/sitemap.xml. - Submit to Search Console: In Google Search Console, go to Index > Sitemaps. Enter the URL of your sitemap and click “Submit.”
- Check Status: Ensure the status is “Success.” If you see errors, click on them to investigate.
Check for noindex Tags
The noindex tag tells search engines not to include a specific page in their index. Sometimes, pages are accidentally set to noindex.
- WordPress Reading Settings: In your WordPress dashboard, navigate to Settings > Reading. Ensure the box next to “Search engine visibility: Discourage search engines from indexing this site” is unchecked. If it’s checked, your entire site is
noindex! - Individual Page/Post Settings: Using Yoast SEO or Rank Math, edit a few important pages/posts. Look for the “Advanced” or “Schema” tab within the plugin’s meta box. Ensure the option for “Allow search engines to show this Post in search results?” is set to “Yes” or equivalent.
- View Page Source: For a deeper check, open any important page in your browser, right-click, and select “View Page Source” (or “Inspect Element” and go to the “Elements” tab). Search for
<meta name="robots" content="noindex" />within the<head>section. If you find it on a page you want indexed, you’ve found a problem!
Step 2: Analyze On-Page SEO Fundamentals – Making Your Content Shine
Once your site is indexable, it’s time to ensure your individual pages are optimized for search engines and, more importantly, for your users. This is where your content and structure come into play.
Review Title Tags and Meta Descriptions
These are your website’s storefront window in search results. They entice users to click.
- Check Important Pages: Focus on your homepage, key service pages, and popular blog posts.
- Using Your SEO Plugin: In WordPress, edit a page/post and look at the Yoast SEO or Rank Math meta box.
- Title Tag: Should be unique, descriptive, include your primary keyword, and be around 50-60 characters long.
- Meta Description: A concise summary (150-160 characters) that explains what the page is about and encourages clicks. It should also include your keyword naturally.
- Avoid Duplicates: Use Google Search Console (Pages > View page performance in Search Console > Clicks on Search Results > Average CTR) or tools like Screaming Frog (for larger sites) to identify duplicate title tags or meta descriptions.
Optimize Headings (H1, H2, H3)
Headings structure your content, making it easier for both users and search engines to understand.
- One H1 Per Page: Each page should have only one
<h1>tag, which typically contains the main topic or title of the page. It should include your primary keyword. - Hierarchical Structure (H2, H3, H4): Use
<h2>for major sections,<h3>for sub-sections of an<h2>, and so on. They should naturally break down your content and often include semantic keywords. - Readability: Ensure your headings guide the reader through the content logically.
- Example:
<h1>How to Perform a Basic SEO Audit on Your Website</h1>
<h2>Step 1: Check Your Website's Indexability</h2>
<h3>Verify Google Search Console Setup</h3>
<h3>Review `robots.txt` File</h3>
<h2>Step 2: Analyze On-Page SEO Fundamentals</h2>
<h3>Review Title Tags and Meta Descriptions</h3>
- Example:
Evaluate Content Quality and Keywords
Content is king, but only if it’s high-quality, relevant, and satisfies user intent.
- Relevance & Depth: Does your content thoroughly address the topic? Is it comprehensive and helpful? For “How to Perform a Basic SEO Audit on Your Website,” does it actually provide actionable steps?
- Keyword Integration: Are your primary and semantic keywords naturally integrated into the content, headings, and introductory paragraphs? Avoid keyword stuffing – focus on natural language.
- Readability: Break up long paragraphs. Use bullet points, numbered lists, and short sentences. Tools like Grammarly or even the readability analysis in Yoast SEO can help.
- Originality: Is your content unique, or is it merely rehashed information? Google values original thought and unique value.
- First
 placeholder here.
- First
 placeholder here.
Image Optimization (Alt Text and File Size)
Images enhance user experience, but they can also slow down your site or be missed by search engines if not optimized.
- Alt Text: Every image should have descriptive
alt text. This helps visually impaired users (screen readers) and search engines understand what the image is about. It’s also a great place to subtly include keywords.- In WordPress, when you upload an image or select one from the media library, you’ll see a field for “Alt Text.” Fill it in!
- File Size: Large image files drastically slow down your site.
- Compress images before uploading them (use tools like TinyPNG or Squoosh).
- Use WordPress plugins like Smush or Imagify to automatically optimize images upon upload.
- Image Format: Use modern formats like WebP where possible, or JPEG for photos and PNG for graphics with transparency.
Internal and External Linking
Linking correctly improves navigation, distributes “link equity,” and provides value to your users.
- Internal Links: Link to other relevant pages within your own website. This helps users discover more of your content and strengthens the SEO of the linked pages. Ensure anchor text (the clickable words) is descriptive and relevant.
- External Links: Link out to high-authority, relevant external sources. This demonstrates your expertise and provides additional value to your readers. Make sure external links open in a new tab (
target="_blank"). - Check for Broken Links: Broken links (404 errors) hurt user experience and can signal to search engines that your site isn’t well-maintained.
- Use Google Search Console (Index > Pages > Not found (404)) to find broken links on your site that Google has crawled.
- Consider a WordPress plugin like Broken Link Checker (use sparingly as it can be resource-intensive, or run it periodically and then deactivate).
- Manually check key internal and external links.
Step 3: Assess Technical SEO Health – Under the Hood Check
Technical SEO ensures your website’s foundation is solid, allowing search engines to efficiently crawl, index, and understand your content. This often involves aspects related to your hosting, theme, and general site configuration.
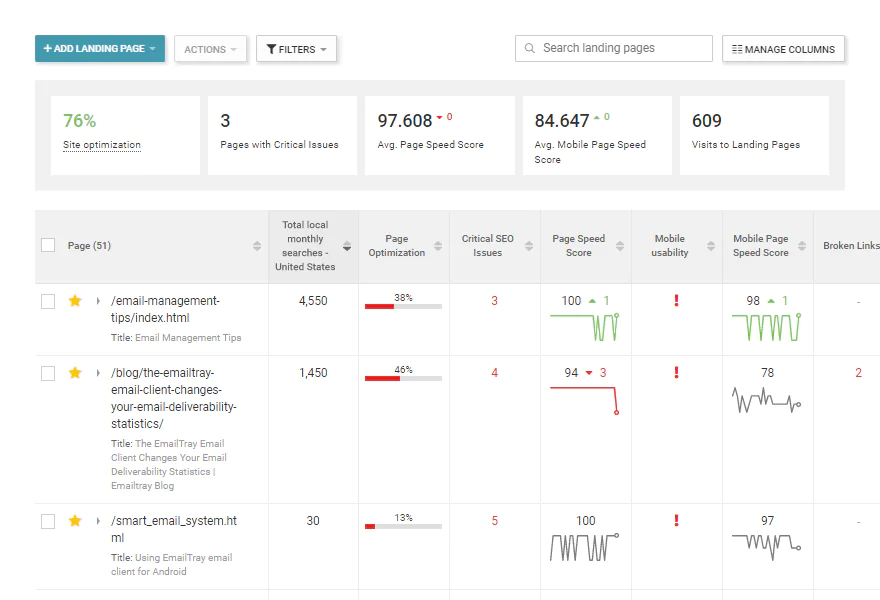
Website Speed and Core Web Vitals
Slow websites frustrate users and get penalized by search engines. Google’s Core Web Vitals (LCP, FID, CLS) are key ranking factors.
- Google PageSpeed Insights: Go to
developers.google.com/speed/pagespeed/insights/and enter your URL. It will give you a score and actionable recommendations for both mobile and desktop. - Common Speed Culprits:
- Large Images: (Already covered, but worth repeating!)
- Poor Hosting: Cheap shared hosting can be a bottleneck. Consider upgrading if speed is consistently an issue despite other optimizations.
- Unoptimized WordPress Theme: Some themes are bloated with unnecessary code (CSS, JavaScript). Choose lightweight, well-coded themes.
- Too Many Plugins: Each plugin adds code and can slow down your site. Audit your plugins – deactivate and delete any you don’t actively use.
- Lack of Caching: Caching plugins (like WP Rocket, LiteSpeed Cache, W3 Total Cache) create static versions of your pages, serving them much faster than dynamically generating them from the database with every request.
- Measure in Search Console: Go to Experience > Core Web Vitals in Google Search Console to see your site’s performance data as observed by real Chrome users.
- Second
 placeholder here.
- Second
 placeholder here.
Mobile-Friendliness
With most searches happening on mobile devices, your site must be mobile-friendly.
- Google’s Mobile-Friendly Test: Use
search.google.com/test/mobile-friendlyto quickly check if Google considers your page mobile-friendly. - Responsive Design: Ensure your theme is responsive, meaning it adapts seamlessly to different screen sizes. Test your site on various devices or use your browser’s developer tools (right-click > Inspect > Toggle device toolbar) to simulate different screen sizes.
- Tap Targets and Font Sizes: Make sure buttons and links are easy to tap with a finger, and text is readable without zooming.
SSL Certificate (HTTPS)
HTTPS encrypts the connection between your website and the user’s browser, making it secure. It’s a minor ranking factor and a strong trust signal.
- Check Your URL: Look at your browser’s address bar. Do you see
https://before your domain name and a padlock icon? If not, you don’t have an SSL certificate. - Implement SSL: Most hosting providers offer free SSL certificates (e.g., Let’s Encrypt). If yours doesn’t, you can purchase one or use a service like Cloudflare.
- Update Internal Links: After migrating to HTTPS, ensure all your internal links, images, and other assets are loading via HTTPS to avoid “mixed content” warnings. Use a plugin like Really Simple SSL for WordPress to handle this easily.
URL Structure
Clean, descriptive URLs are good for both users and search engines.
- Readable URLs: Your URLs should be easy to understand and ideally include your target keywords.
- Good:
yourdomain.com/basic-seo-audit-guide - Bad:
yourdomain.com/?p=123oryourdomain.com/category/blog/post-title-with-lots-of-numbers
- Good:
- WordPress Permalinks: In WordPress, go to Settings > Permalinks and choose “Post name.” If you change your permalink structure, set up 301 redirects for your old URLs to prevent broken links (see next point).
Broken Links and Redirects
Beyond internal broken links, you also need to manage redirects properly, especially if you’ve changed URLs.
-
301 Redirects: If you change a URL, delete a page, or merge content, always implement a 301 (permanent) redirect from the old URL to the new, relevant URL. This preserves any SEO value and sends users to the right place.
- For WordPress, plugins like Redirection can manage this.
- Manually, you can add 301 redirects to your
.htaccessfile (found in your public HTML directory via FTP or your hosting control panel’s File Manager).
# Permanent 301 redirect
Redirect 301 /old-page.html https://yourdomain.com/new-page-url/
Warning: Editing
.htaccessrequires caution. A single typo can break your entire site. Always back up your site before making manual changes. -
404 Pages: While you want to minimize 404s, they will inevitably happen. Ensure your 404 page is custom, helpful, and guides users back to relevant content on your site.
Step 4: Examine User Experience (UX) and Content – Beyond the Bots
While we often focus on what search engines like, remember that Google’s ultimate goal is to serve content that users love. A good user experience translates to better SEO.
Navigation and Site Structure
A logical and intuitive site structure helps both users and search engines find content.
- Clear Navigation: Is your main menu easy to understand? Can users quickly find what they’re looking for?
- Breadcrumbs: Implement breadcrumbs (e.g., Home > Blog > Category > Post Title) to help users understand their location on your site and provide internal links.
- Logical Categories: Group similar content into categories and tags. This helps organize your site and signals content relevance to search engines.
Bounce Rate and Time on Page (Google Analytics)
These metrics from Google Analytics give you clues about how engaging your content is.
- High Bounce Rate: If users land on a page and immediately leave (high bounce rate), it could mean:
- The page isn’t relevant to their search query.
- The content is poor or hard to read.
- The page loads slowly.
- Low Time on Page: Similarly, if users spend very little time on your page, they might not be finding value.
- Investigate: Look at pages with high bounce rates or low time on page in Google Analytics (Behavior > Site Content > All Pages). Are these pages serving their purpose? Can the content be improved, or the user intent better satisfied?
Content Freshness and Depth
Google loves fresh, comprehensive content that provides real value.
- Update Old Content: Don’t just publish and forget. Regularly review and update older blog posts, adding new information, images, and links. This shows Google your site is alive and relevant.
- Long-Form Content: Aim for comprehensive guides on important topics. Longer, well-researched content often performs better in search because it can cover a topic in greater depth and attract more backlinks.
- Variety: Include different content types (text, images, videos, infographics) to keep users engaged.
Step 5: Basic Off-Page SEO Check – What Others Say About You
Off-page SEO primarily refers to actions taken outside of your website to impact its search engine rankings, most notably backlinks.
Backlink Profile (Google Search Console)
Backlinks (links from other websites to yours) are like votes of confidence. More high-quality backlinks generally mean higher authority.
- Check in Search Console: Go to Links in Google Search Console. This will show you your “Top linking sites” and “Top linked pages.”
- Quality over Quantity: Focus on backlinks from reputable, relevant websites. A few strong links are better than many low-quality, spammy ones.
- Identify Bad Links (and Disavow): Look for suspicious or spammy links (e.g., from irrelevant foreign sites, link farms). If you find many, you might consider disavowing them using Google’s Disavow Tool, but this is an advanced step and should only be done if you suspect a manual penalty or severe negative SEO attack. For a basic audit, simply be aware of your backlink profile.
- Third
 placeholder here.
- Third
 placeholder here.
Brand Mentions
Even if a mention doesn’t include a direct link, Google is sophisticated enough to understand brand mentions.
- Simple Google Search: Search for your brand name or website name. Are people talking about you? Are there positive or negative reviews?
- Set up Alerts: Use Google Alerts to monitor mentions of your brand. This helps you find new opportunities for engagement or address any negative feedback quickly.
Troubleshooting Common SEO Audit Issues
It’s rare to perform an SEO audit and find everything perfect. Here are some common issues and quick fixes.
- “My site isn’t indexed or only partially indexed!”
- Fix: Re-check your
robots.txtforDisallow: /. Ensure “Discourage search engines from indexing this site” is unchecked in WordPress Settings > Reading. Check individual pages fornoindextags. Use Search Console’s URL inspection tool.
- Fix: Re-check your
- “My site is really slow!”
- Fix: Optimize images, implement a caching plugin (WP Rocket is highly recommended), choose a better hosting provider if necessary, audit your theme for bloat, and consider a CDN.
- “I have tons of broken links!”
- Fix: Use Google Search Console’s “Not found (404)” report. For WordPress, consider running a Broken Link Checker plugin periodically (then deactivate it to save database resources) or use an online broken link checker. Implement 301 redirects for any URLs you’ve changed or removed.
- “My title tags and meta descriptions are all duplicated.”
- Fix: Use your SEO plugin (Yoast SEO or Rank Math) to manually craft unique, keyword-rich titles and descriptions for your most important pages. For less important pages, ensure the plugin is configured to generate them intelligently.
- “My content is good, but I’m still not ranking.”
- Fix: Re-evaluate your keyword research – are you targeting terms that are too competitive? Is your content truly comprehensive and unique? Are you satisfying user intent? Look at your competitors’ content. Improve your internal linking. Seek out opportunities for quality backlinks.
Conclusion: Your First Step Towards SEO Success
Congratulations! You’ve just learned how to perform a basic SEO audit on your website. This isn’t a one-and-done task; it’s an ongoing process that keeps your website healthy and visible. By systematically going through these steps, you’ve gained invaluable insights into your site’s performance and identified actionable areas for improvement.
The goal of this audit is not just to please search engines, but to create a better, more accessible experience for your users. Remember, SEO is a marathon, not a sprint. Consistent effort in optimization, combined with creating genuinely helpful content, will undoubtedly lead to long-term success.
Next Steps:
- Prioritize & Implement: Go through your audit findings and prioritize the issues. Tackle the most impactful and easiest fixes first.
- Track Changes: Use your spreadsheet to log every change you make.
- Monitor Performance: Keep an eye on Google Search Console and Google Analytics. Look for improvements in indexing, clicks, impressions, and user behavior.
- Repeat: Aim to perform a basic SEO audit at least once or twice a year, or after any major website changes.
Keep learning, keep optimizing, and keep making that complex tech simple!
Frequently Asked Questions (FAQ)
How often should I perform an SEO audit?
For most DIY website builders and small businesses, performing a basic SEO audit every 3-6 months is a good practice. If you make significant changes to your website (e.g., a new theme, major content overhaul, site migration), it’s wise to perform a mini-audit immediately afterward. Continuous monitoring through Google Search Console and Google Analytics should happen weekly or monthly.
What’s the difference between a basic and an advanced SEO audit?
A basic SEO audit, like the one we’ve covered, focuses on fundamental aspects that have a significant impact: indexability, on-page elements, core technical health, and basic backlink checks. An advanced audit delves much deeper, involving extensive competitor analysis, detailed backlink analysis (using paid tools), advanced technical crawls (JavaScript rendering, log file analysis), in-depth content gap analysis, and more complex data analysis.
Do I need expensive tools for an SEO audit?
No, not for a basic audit! As we’ve shown, most of what you need can be done with free tools like Google Search Console, Google Analytics, Google PageSpeed Insights, and your website’s admin panel (especially if you’re using WordPress with an SEO plugin). For larger sites or more in-depth analysis, paid tools like Semrush, Ahrefs, or Moz can be invaluable, but they are not prerequisites for getting started.
Can SEO audits harm my website?
The audit itself cannot harm your website. However, implementing changes based on an audit can if not done carefully. For instance, incorrectly editing your robots.txt or .htaccess file can block search engines or break your site. Always back up your website before making significant changes, especially to core files or your database. When in doubt, consult a developer or a more experienced SEO professional.
How long does it take to see results after an audit?
SEO results are rarely immediate. After implementing changes from an audit, it can take anywhere from a few weeks to several months to see significant improvements in search rankings and organic traffic. Factors like your website’s age, authority, industry competition, and the extent of your changes all play a role. The key is consistency and patience.
See more: How to Perform a Basic SEO Audit on Your Website.
Discover: AskByteWise.