Welcome to AskByteWise, where we make complex tech simple! If you’re running a website, understanding your audience is key to growth. That’s where Google Analytics comes in. This comprehensive guide will walk you through how to set up and use Google Analytics 4 (GA4), Google’s latest and most powerful analytics platform. Whether you’re a DIY website builder or a beginner developer, we’ll break down every step, ensuring you can confidently collect and interpret your website data to make informed decisions. Let’s get started on unlocking insights into your website’s performance!
Before You Begin: Essential Prerequisites
Before we dive into the technicalities of how to set up and use Google Analytics 4 (GA4), make sure you have the following ready. These simple preparations will ensure a smooth setup process:
- A Google Account: You’ll need an active Google account (like a Gmail account) to access Google Analytics. If you don’t have one, it’s free and easy to create.
- Website Access:
- WordPress Users: You’ll need administrative access to your WordPress dashboard. This includes being able to install plugins, edit theme files (if you choose the manual method), or use a full-site editor.
- Other CMS/Static Sites: You should have access to your website’s backend code, typically through an FTP client, your hosting control panel (like cPanel), or direct access to your HTML files.
- Basic Understanding of Your Website Structure: Knowing if your site is built on WordPress, Shopify, a custom HTML/CSS setup, or another CMS will help you choose the best installation method.
- Admin Privileges: Ensure your Google account has the necessary permissions to create and manage properties within Google Analytics.
What is Google Analytics 4 (GA4) and Why Do You Need It?
For years, website owners relied on Universal Analytics (UA) to track website performance. However, the digital landscape has evolved dramatically, with users interacting across multiple devices and platforms. Google Analytics 4 (GA4) is Google’s response to this shift, offering a fundamentally different and more robust way to understand user behavior. Learning how to set up and use Google Analytics 4 (GA4) is no longer optional; it’s essential for modern web analytics.
The Shift from Universal Analytics (UA)
Universal Analytics primarily focused on “sessions” and “page views,” treating each interaction somewhat independently. GA4, on the other hand, is event-driven. This means every interaction, from a page view to a click, a scroll, or a video play, is considered an “event.” This unified data model allows for a more holistic, user-centric view across your website and apps.
Warning: Universal Analytics officially stopped processing new data on July 1, 2023. While you can still access historical data, new data will only be collected by GA4 properties. Migrating to GA4 is crucial to continue gathering insights.
Key Benefits of GA4
- User-Centric Data: GA4 tracks users across different devices and platforms, providing a more complete picture of their journey, rather than fragmenting data by device.
- Event-Based Tracking: Offers greater flexibility in measuring interactions. Instead of predefined hit types, everything is an event, allowing for highly customized tracking.
- Enhanced Machine Learning: Leverages Google’s AI to provide predictive insights, such as potential revenue from a specific customer segment or the likelihood of churn, even with less data.
- Improved Privacy Controls: Designed with privacy in mind, GA4 offers more granular data control and operates effectively in a world with increasing data privacy regulations.
- Future-Proof: Built to adapt to a cookieless future, making it a more sustainable analytics solution.
- Free: Yes, GA4 is completely free to use, just like its predecessor.
Step 1: Create a Google Analytics 4 Property
The first step in learning how to set up and use Google Analytics 4 (GA4) is to create your GA4 property within Google Analytics.
Accessing Google Analytics
- Open your web browser and go to analytics.google.com.
- Sign in with your Google account if prompted.
Setting Up a New GA4 Property
If this is your first time using Google Analytics, you’ll see a prompt to Start measuring. If you already have Universal Analytics properties, you’ll need to navigate to the Admin section.
- Click “Start measuring” or, if you have existing properties, click Admin (the gear icon) in the bottom-left corner.
- In the Admin column (the middle one), click Create Property.
- Property Setup:
- Property name: Enter a descriptive name for your property, e.g., “AskByteWise Website GA4.”
- Reporting time zone: Select your country’s time zone. This affects how your data is reported.
- Currency: Choose your local currency.
- Click Next.
- Business Information:
- Select your Industry category (e.g., “Computers & Electronics”).
- Select your Business size.
- Choose how you intend to use Google Analytics (e.g., “Generate leads,” “Drive online sales,” “Examine user behavior”). Select all that apply.
- Click Create.
Congratulations! You’ve just created your GA4 property. The next step is to tell GA4 where to collect data from.
Creating a Data Stream
A “data stream” is the source of your data – in our case, your website. GA4 uses data streams to collect information from various platforms (web, iOS, Android).
- After creating your property, you’ll be automatically directed to the Data streams page. If not, go to Admin > Data streams in your new property.
- Select Web as your platform.
- Set up your web stream:
- Website URL: Enter your website’s URL (e.g.,
https://www.askbytewise.com). Ensure you selecthttp://orhttps://correctly. - Stream name: Give your stream a descriptive name (e.g., “AskByteWise Web Stream”).
- Enhanced measurement: This feature is usually enabled by default and is highly recommended. It automatically tracks common events like page views, scrolls, outbound clicks, site search, video engagement, and file downloads without needing to add extra code. Keep it turned on!
- Click Create stream.
- Website URL: Enter your website’s URL (e.g.,
Once created, you’ll see your new Web stream details, including the crucial Measurement ID (it starts with “G-“). This ID is what links your website to your GA4 property. Keep this ID handy; you’ll need it for the next step.
Step 2: Install Google Analytics 4 on Your Website
This is where you connect your website to your newly created GA4 property. There are several ways to do this, and we’ll cover the most common ones, focusing on WordPress, as it’s popular with DIY builders. Choosing the right method depends on your comfort level and website platform.
Method 1: Using the Site Kit by Google Plugin (Recommended for WordPress)
For WordPress users, Site Kit by Google is the easiest and most recommended way to install GA4. It integrates multiple Google services (Search Console, AdSense, PageSpeed Insights, and Analytics) seamlessly into your WordPress dashboard.
- Install Site Kit:
- Navigate to your WordPress dashboard.
- Go to Plugins > Add New.
- In the search bar, type “Site Kit by Google.”
- Find the plugin by Google and click Install Now, then Activate.
- Connect Site Kit to Google:
- After activation, you’ll see a prompt to Start Setup for Site Kit. Click it.
- Follow the on-screen instructions, which will involve signing in with your Google account and granting necessary permissions.
- You’ll be asked to verify site ownership (Site Kit handles this for you through Search Console).
- Click Go to my Dashboard.
- Connect Google Analytics 4:
- On the Site Kit Dashboard, locate the Analytics section.
- Click Connect Service.
- You’ll be prompted to sign in with your Google account again if not already signed in. Grant the necessary permissions.
- Site Kit will then ask you to select an existing GA4 property from a dropdown list. Choose the GA4 property you created in Step 1 (e.g., “AskByteWise Website GA4”).
- Click Configure Analytics.
Site Kit will now automatically insert the GA4 tracking code (using your Measurement ID) into your WordPress website. No manual code editing required!
Method 2: Using a Dedicated GA4 Plugin (e.g., MonsterInsights, GA Google Analytics)
Many plugins are specifically designed to help you integrate GA4. GA4 Google Analytics for WordPress by MonsterInsights is a popular choice, offering advanced features beyond just installation. The process is similar to Site Kit:
- Install and activate your chosen GA4 plugin from Plugins > Add New.
- Follow the plugin’s setup wizard, which will typically ask you to authenticate with your Google account and select your GA4 property.
- These plugins handle inserting the tracking code into your site’s header automatically.
Method 3: Manual Installation via Theme Files (For WordPress or Other CMS/Static Sites)
If you prefer not to use a plugin or are working with a non-WordPress site, you can manually add the GA4 tracking code. This requires accessing your site’s theme files (for WordPress) or your website’s HTML head section (for any website).
Best Practice: If you’re manually editing WordPress theme files, always use a child theme. This prevents your changes from being overwritten when your parent theme updates. If you’re not using a child theme, consider using a custom plugin for code snippets or a dedicated “Custom CSS & JS” plugin. For this guide, we’ll show the direct
header.phpmethod as it’s common for beginners, but keep the child theme advice in mind for more robust site management.
-
Get Your GA4 Global Site Tag (GTAG.js):
-
In your Google Analytics account, go to Admin > Data streams.
-
Click on your web stream.
-
Under “Google tag,” click on View tag instructions.
-
Click Install manually.
-
Copy the entire code snippet provided. It will look something like this:
<!-- Google tag (gtag.js) -->
<script async src="https://www.googletagmanager.com/gtag/js?id=G-XXXXXXXXXX"></script>
<script>
  window.dataLayer = window.dataLayer || [];
  function gtag(){dataLayer.push(arguments);}
  gtag('js', new Date());

  gtag('config', 'G-XXXXXXXXXX');
</script>
(Replace
G-XXXXXXXXXXwith your actual Measurement ID).
-
-
Add the Code to Your Website:
-
For WordPress (via
header.php):- Navigate to your WordPress dashboard.
- Go to Appearance > Theme File Editor.
- On the right sidebar, find and click on Theme Header (header.php).
- Locate the closing
</head>tag. - Paste the GA4 code snippet just before the
</head>tag. - Click Update File.
<!DOCTYPE html>
<html <?php language_attributes(); ?>>
<head>
<meta charset="<?php bloginfo( 'charset' ); ?>">
<meta name="viewport" content="width=device-width, initial-scale=1">
<link rel="profile" href="https://gmpg.org/xfn/11">
<?php wp_head(); ?>
<!-- Google tag (gtag.js) -->
<script async src="https://www.googletagmanager.com/gtag/js?id=G-XXXXXXXXXX"></script>
<script>
  window.dataLayer = window.dataLayer || [];
  function gtag(){dataLayer.push(arguments);}
  gtag('js', new Date());

  gtag('config', 'G-XXXXXXXXXX');
</script>
</head>
<body <?php body_class(); ?>>
Warning: Editing
header.phpdirectly can break your site if done incorrectly. Always back up your theme files or use a child theme for these kinds of modifications. -
For Other CMS/Static HTML Sites:
- Access your website’s HTML files via FTP, your hosting control panel, or your CMS’s theme editor.
- Open the main template file that controls your website’s header (e.g.,
index.html,base.html, or a specific template file). - Paste the GA4 code snippet just before the
</head>tag on every page you want to track. If you have a global header file, placing it there will cover your entire site.
-
Method 4: Using Google Tag Manager (GTM)
Google Tag Manager is an advanced solution for managing all your website’s tracking codes (tags) in one place without directly editing your website’s code. While powerful, it adds another layer of complexity. If you’re a beginner, stick to methods 1-3. If you already use GTM, you can add a new “Google Analytics: GA4 Configuration” tag using your Measurement ID.
Step 3: Verify Your GA4 Installation
You’ve done the work, now let’s confirm everything is connected! This is a crucial step in understanding how to set up and use Google Analytics 4 (GA4) correctly.
Realtime Report
The Realtime report shows activity on your website as it happens.
- In your GA4 property, navigate to Reports > Realtime.
- Open your website in a new browser tab or on your phone.
- Browse a few pages, click some links, scroll down.
- Switch back to the GA4 Realtime report. Within seconds, you should see your activity reflected: “Users in last 30 minutes,” “Views by page title,” and “Event count by Event name” (e.g.,
page_view,scroll).
If you see your activity, great! Your GA4 installation is working.
DebugView
For more detailed real-time debugging, especially if you’re tracking custom events, DebugView is invaluable.
- To use DebugView, you need to enable debug mode on your browser.
- For Chrome: Install the Google Analytics Debugger Chrome extension. Activate it by clicking its icon.
- For WordPress (using Site Kit): Site Kit often has a built-in debug mode or integrates well with browser extensions.
- In your GA4 property, go to Admin > DebugView.
- Now, browse your website with the debugger enabled. In DebugView, you’ll see a stream of events, including
page_view,scroll, and any other enhanced measurement events, along with their parameters. This helps you confirm that specific events are firing as expected.
Step 4: Explore Key GA4 Reports and Features
Now that you know how to set up and use Google Analytics 4 (GA4) to collect data, let’s look at where that data lives and how you can interpret it. GA4’s interface is different from Universal Analytics, so spend some time getting familiar with it.
The GA4 Interface Overview
On the left-hand navigation, you’ll find:
- Home: A customizable overview of your most important metrics.
- Reports: The heart of your data, containing pre-built reports.
- Explore: Advanced analysis tools for creating custom reports and segments.
- Advertising: Tools to understand user journeys and conversions, especially for ad campaigns.
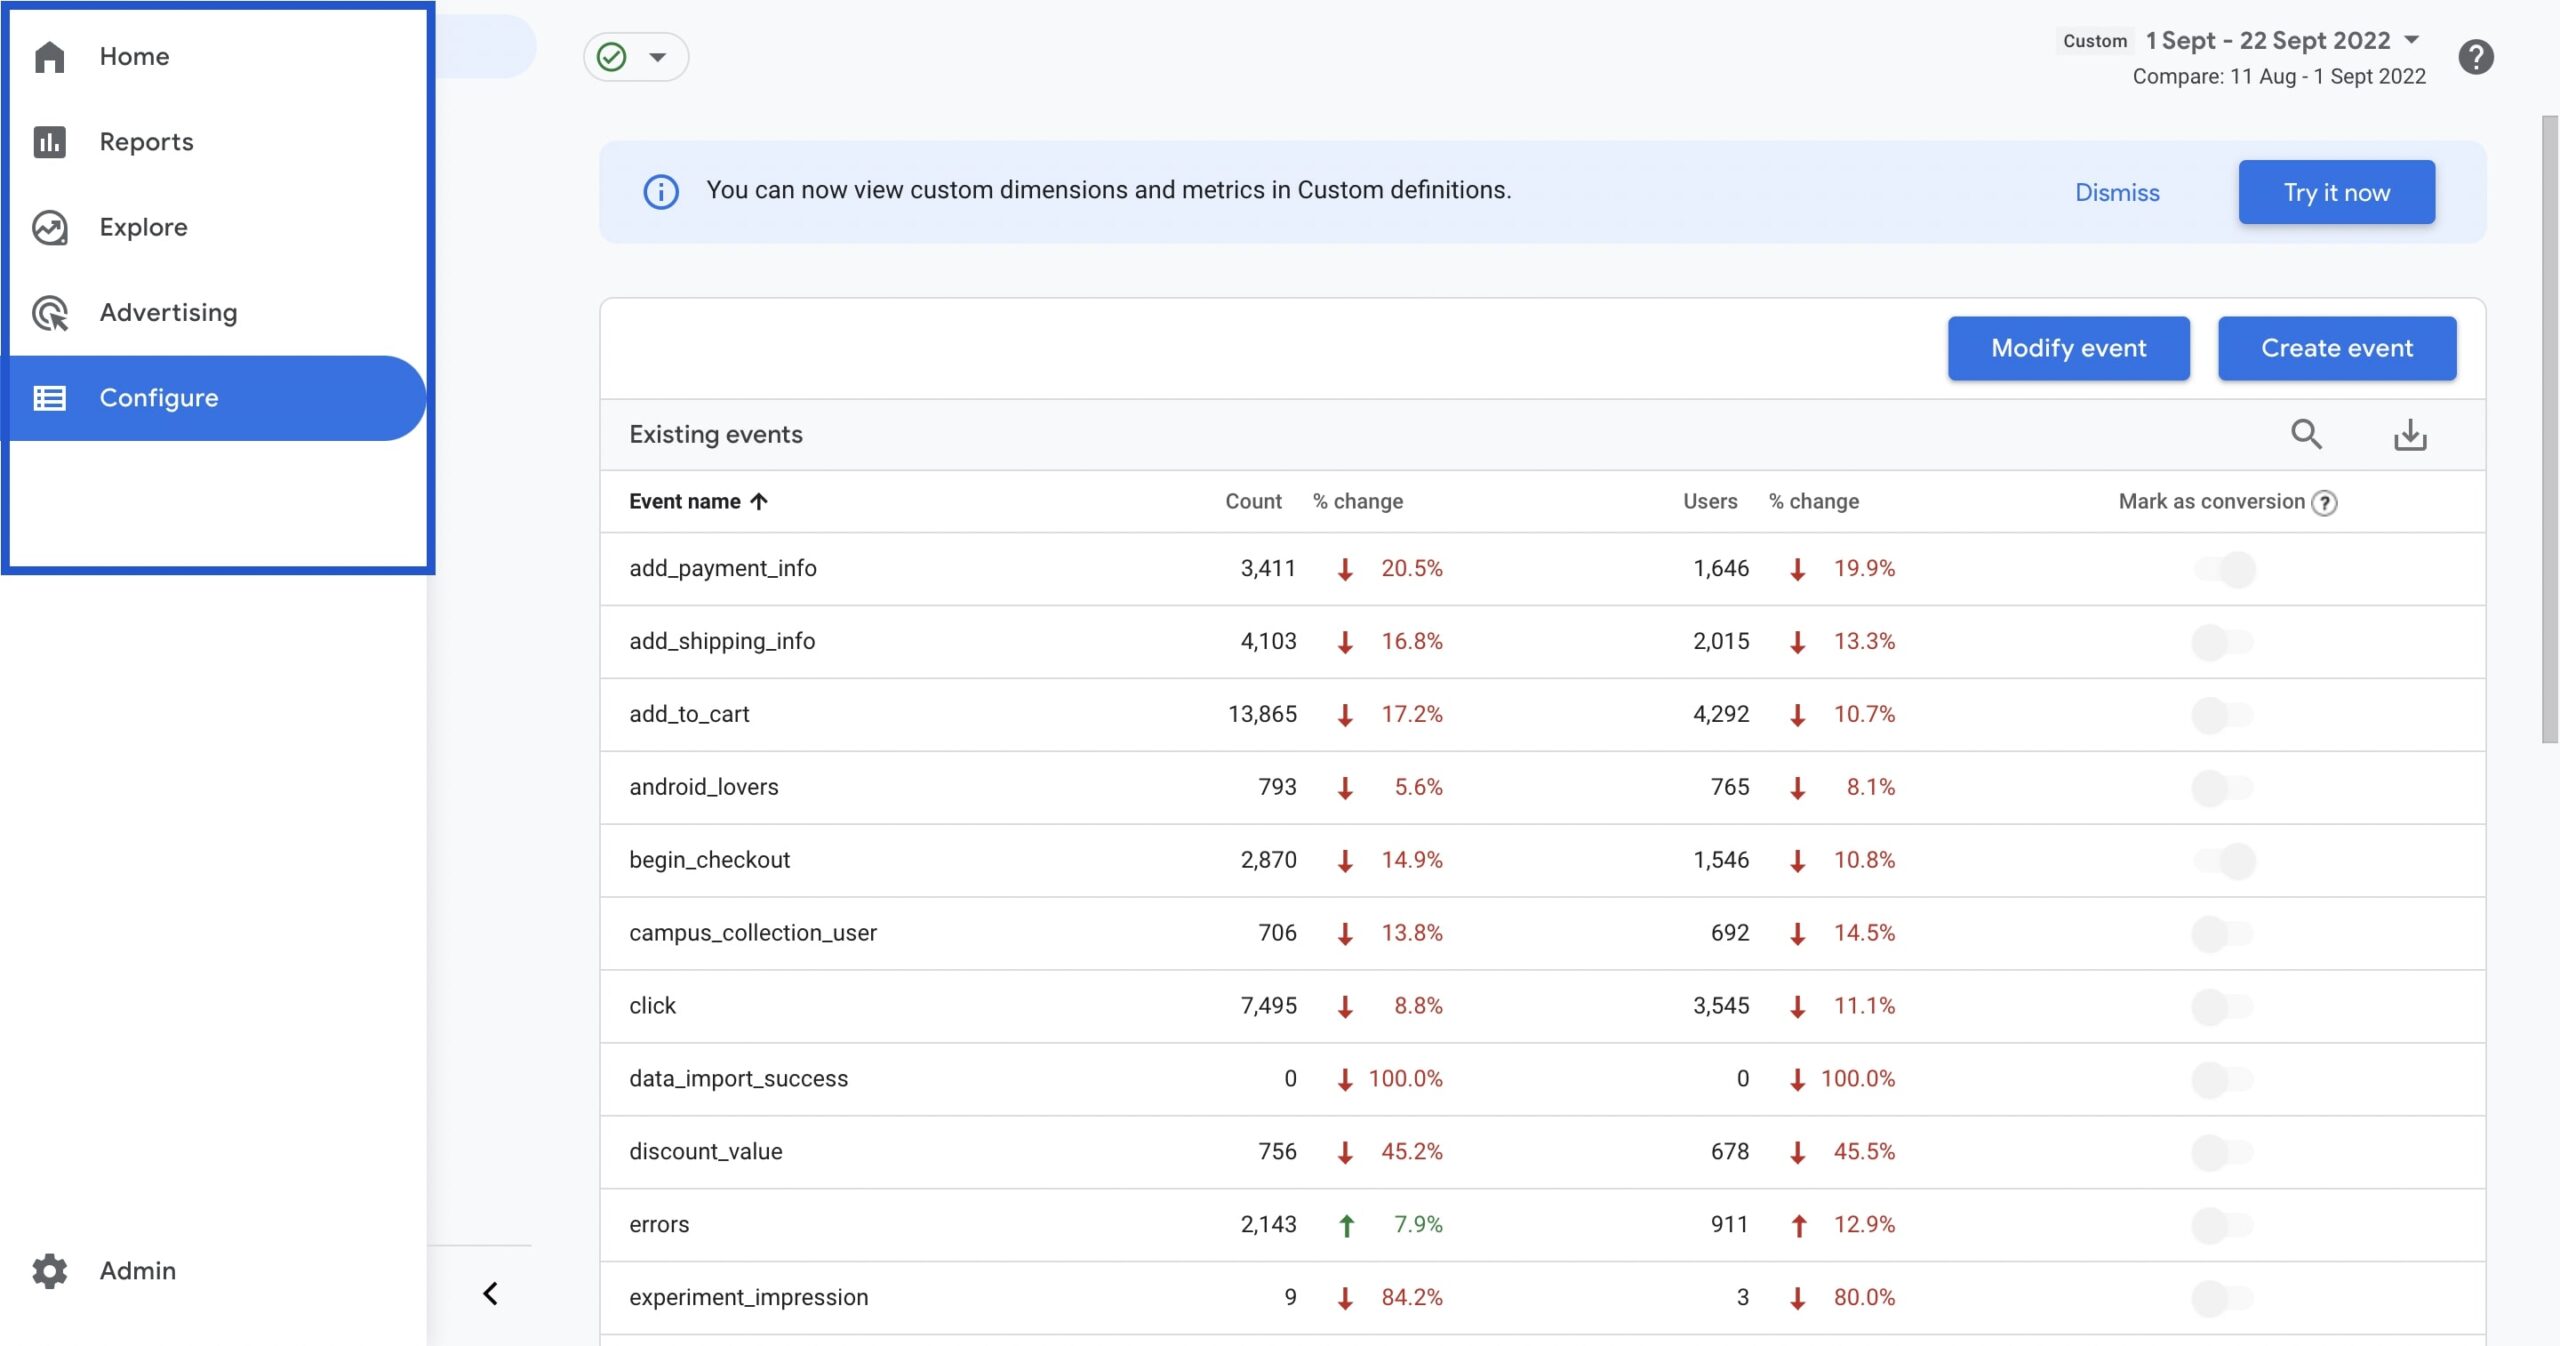
- Configure: Where you manage events, conversions, custom definitions, and audiences.
Key Reports to Start With
Focus on these reports to get a good initial understanding of your website’s performance:
- Realtime Report: (As discussed) Instantly see who’s on your site right now. Great for verifying changes or seeing immediate impact.
- Life cycle Reports: These reports track the user journey from acquisition to retention.
- Acquisition > Traffic acquisition: Shows how users find your site (e.g., Organic Search, Direct, Referral). This is critical for understanding your marketing channels.
- Engagement > Overview: Provides a high-level view of how users interact with your site, including average engagement time, engaged sessions, and events per user.
- Engagement > Pages and screens: Shows which pages are most viewed and engaged with.
- Engagement > Events: Lists all events tracked on your site and their counts. This is where you’ll see
page_view,scroll,click, and any custom events you set up.
- User Reports: These reports focus on who your users are.
- Demographics > Demographics overview: Provides insights into your audience’s age, gender, and interests (if data collection allows).
- Tech > Tech overview: Shows what devices, browsers, and operating systems your users are employing. This is vital for ensuring your website is optimized for their environment.
- Monetization Reports (if applicable): If you run an e-commerce site, these reports cover purchases, revenue, and product performance.
Understanding Events vs. Pageviews
Remember, GA4 is event-driven. A page_view is just one type of event. Instead of just counting page loads, GA4 automatically tracks other valuable events like:
scroll: When a user scrolls to the bottom of a page.click: When a user clicks on an outbound link.view_search_results: When a user performs a search on your site.file_download: When a user downloads a file.
You can also set up custom events to track specific actions unique to your website, like form submissions, video plays, or specific button clicks. This allows for incredibly granular insights into user behavior.
Customizing Reports and Explorations
While the standard reports are great, GA4’s Explore section is where its true power lies. Here, you can build custom reports, such as:
- Free-form exploration: Drag and drop dimensions (like “Device category”) and metrics (like “Total users”) to create custom tables and charts.
- Path exploration: Visualize the common paths users take through your website, identifying popular routes and potential drop-off points.
- Funnel exploration: Create funnels to understand how users progress through a series of steps (e.g., viewing a product, adding to cart, purchasing).
Don’t be afraid to experiment with the Explore section once you’re comfortable with the basic reports.
Troubleshooting Common GA4 Setup Issues
Even with the clearest instructions on how to set up and use Google Analytics 4 (GA4), you might encounter bumps along the way. Here are some common issues and their solutions:
-
GA4 Data Not Showing Up in Realtime Reports:
- Check your Measurement ID: Double-check that the Measurement ID (
G-XXXXXXXXXX) used on your website matches the one in your GA4 property’s data stream settings. A single typo will prevent data collection. - Clear Caches: If you’re using a caching plugin on WordPress (like WP Super Cache or LiteSpeed Cache) or your hosting has server-side caching, clear all caches after installing the GA4 code. Caching can prevent the new code from loading for visitors.
- Ad Blockers: Browser extensions like ad blockers can sometimes block GA4 tracking. Test your site in an incognito window with extensions disabled.
- Code Placement: Ensure the GA4 code snippet is placed correctly just before the
</head>tag. If it’s elsewhere, it might not load properly. - Plugin Conflicts: If using a plugin, try temporarily deactivating other plugins one by one to see if there’s a conflict preventing the GA4 plugin from working.
- Check your Measurement ID: Double-check that the Measurement ID (
-
Incorrect Data or Incomplete Events:
- Enhanced Measurement: Verify that “Enhanced measurement” is enabled for your web data stream (Admin > Data streams > Your web stream).
- DebugView: Use DebugView (as described in Step 3) to see the exact events and parameters being sent from your website. This is crucial for pinpointing what’s missing.
- Custom Event Configuration: If you’ve set up custom events, ensure their triggers and parameters are correctly configured.
-
Can’t Find My Measurement ID (G-XXXXXXXXXX):
- In Google Analytics, go to Admin > Data streams.
- Click on your specific web data stream.
- Your Measurement ID will be prominently displayed at the top of the stream details page.
-
Universal Analytics (UA) Still Showing Data, but GA4 isn’t:
- Remember, UA and GA4 are separate properties. They collect data independently. You need to explicitly install the GA4 tracking code, even if UA was already working.
- Ensure you’re looking at the correct property in Google Analytics. The property selector is at the top left of the GA interface.
-
Changes Not Appearing After Editing Theme Files:
- This is almost always a caching issue. Clear your website’s cache (plugin, server-side, and CDN if applicable) and your browser’s cache.
Conclusion: Your Website Data Journey Begins!
Mastering how to set up and use Google Analytics 4 (GA4) is a game-changer for understanding your website’s audience and improving its performance. You’ve successfully navigated the process of creating a property, installing the tracking code, verifying its functionality, and exploring the initial reports. This foundational knowledge empowers you to move beyond guesswork and make data-driven decisions that will help your website thrive.
GA4 represents a significant leap forward in web analytics, offering unparalleled insights into user behavior. Don’t be intimidated by its new interface; the core goal remains the same: understanding your users better.
Next Steps
- Regularly Check Reports: Make it a habit to visit your GA4 dashboard and review key reports like “Traffic acquisition” and “Pages and screens” weekly.
- Set Up Conversions: Identify key actions on your site (e.g., form submissions, newsletter sign-ups) and mark them as “conversions” in GA4 (Configure > Conversions). This helps you measure success.
- Explore Custom Events: As your comfort grows, explore setting up custom events for specific interactions that matter most to your business.
- Experiment with Explorations: Dive into the Explore section to create custom reports tailored to your unique questions about user behavior.
- Stay Updated: Google frequently updates GA4. Follow the official Google Analytics blog or AskByteWise.com for the latest features and best practices.
Frequently Asked Questions (FAQ)
Q1: What is the main difference between GA4 and Universal Analytics?
A1: The primary difference is their data model. Universal Analytics (UA) is session-based, focusing on page views. GA4 is event-driven, where every interaction (page view, click, scroll, video play) is considered an event. This allows GA4 to provide a more holistic, user-centric view across different devices and platforms, and offers better privacy controls and predictive capabilities.
Q2: Do I need to keep Universal Analytics (UA) running if I set up GA4?
A2: No, Universal Analytics stopped processing new data on July 1, 2023. While you can access your historical UA data for a period, all new data collection should be through your GA4 property. It’s recommended to fully transition to GA4.
Q3: How long does it take for GA4 data to appear after installation?
A3: Typically, data starts appearing in the Realtime report within a few seconds to a few minutes after the GA4 tracking code is correctly installed and a user (like yourself) visits the site. For other standard reports, it can take up to 24-48 hours for data to fully process and be displayed.
Q4: Can I track multiple websites with one GA4 property?
A4: Yes, you can. Within a single GA4 property, you can create multiple data streams, one for each website you want to track. This allows you to consolidate data for related websites under one umbrella, or simply manage them from a single GA4 account. Each website will have its own unique data stream and Measurement ID.
Q5: Is Google Analytics 4 (GA4) free to use?
A5: Yes, Google Analytics 4 is completely free to use, just like its predecessor, Universal Analytics. It provides robust analytics capabilities for websites and apps without any cost. There are enterprise-level versions (Analytics 360) with additional features and support, but the standard GA4 property is free.
See more: How to Set Up and Use Google Analytics 4 (GA4).
Discover: AskByteWise.