
Hey there, fellow website builders and aspiring digital creators! Noah Evans here, lead content strategist at AskByteWise.com, where our mission is to make complex tech simple. Today, we’re diving deep into a tool that has revolutionized how we create content in WordPress: the Gutenberg Block Editor. If you’re managing your own site, dabbling in web development, or just starting your online journey, understanding this editor is absolutely crucial. This comprehensive guide, A Beginner’s Guide to the Gutenberg Block Editor, is designed to demystify WordPress’s powerful default editor, breaking down its features into easy, actionable steps. By the end of this tutorial, you’ll be confidently building beautiful, structured content, transforming your website with professional flair and helping your content shine.
Before You Begin: What You’ll Need
Before we jump into the wonderful world of blocks, make sure you have a few things ready:
- A WordPress Website: This guide assumes you have an active WordPress installation. Whether it’s on a local development environment or a live site with your chosen hosting provider, access to your WordPress dashboard is essential.
- Administrator Access: You’ll need permission to create and edit posts or pages.
- Basic WordPress Navigation Skills: Familiarity with logging in, finding your posts and pages, and navigating the admin area will be helpful.
- An Open Mind: Gutenberg might feel different if you’re used to the old Classic Editor, but I promise, it’s a huge upgrade!
What Exactly Is the Gutenberg Block Editor? (And Why Should You Care?)
Imagine building something complex, like a house, with a single, massive, inflexible block of concrete. That’s a bit like the old WordPress Classic Editor – a single, large text area where all your content was mixed together. Now, imagine building that same house with individual, interchangeable LEGO bricks, each designed for a specific purpose (a door brick, a window brick, a wall brick). That, my friends, is the Gutenberg Block Editor.
Introduced in WordPress 5.0, Gutenberg replaced the traditional “Classic Editor” with a modern, block-based editing experience. Every piece of content you add – a paragraph, an image, a heading, a button, a video embed – is its own distinct “block.” This modular approach gives you incredible flexibility and control over your layout and design, often reducing the need for custom CSS or complex shortcodes from plugins.
Why Gutenberg Matters for You:
- Visual Editing: What you see is much closer to what your visitors get. You can design complex layouts without touching a single line of code.
- Consistency: Blocks provide a consistent structure, making your content more professional and easier to read.
- Future-Proof: Gutenberg is the foundation for Full Site Editing (FSE), which extends block-based editing to your entire website’s design, including headers, footers, and sidebars. It’s the future of WordPress!
- Accessibility: By structuring content semantically with blocks, Gutenberg often inherently improves the accessibility of your website.
Getting Started: Navigating the Gutenberg Interface
Let’s open up the editor and get acquainted.
-
Access the Editor:
- From your WordPress dashboard, go to Posts > Add New or Pages > Add New.
- This will open the Gutenberg Block Editor.
You’ll notice it looks quite different from the older editor. Don’t worry, it’s intuitive once you know your way around.
The Key Areas of the Gutenberg Editor:
### The Content Area: Your Canvas
This is the main white space where you’ll add all your blocks. It’s designed to give you a clear view of your content, much like a blank canvas waiting for your masterpiece.
### The Top Toolbar: Your Command Center
At the very top of the editor, you’ll find a toolbar with several crucial icons:
- Toggle Block Inserter (+ icon): This is your primary tool for adding new blocks. Clicking it opens a panel with all available blocks.
- Tools: (Pencil/Pointer icon) Allows you to switch between “Edit” mode (for typing) and “Select” mode (for moving and manipulating blocks).
- Undo/Redo Arrows: Self-explanatory, great for fixing mistakes.
- Document Outline: (Three horizontal lines icon) Provides a hierarchical view of your headings and blocks, excellent for navigation and checking your content structure.
- Details: (Circle with ‘i’ icon) Shows word count, character count, time to read, and block count.
- Save Draft / Update / Publish: Depending on the status of your post/page, these buttons save your work, update an existing post, or publish new content to your site.
- Settings Cog: Toggles the visibility of the Settings sidebar. If your sidebar disappears, click this!
- Three Vertical Dots (Options): Contains advanced editor options like switching to a Code editor, copying all content, managing reusable blocks, and more.
### The Settings Sidebar: Customization Central
On the right side of the editor, you’ll see the Settings sidebar. This is where you control the detailed settings for individual blocks and your entire document. It has two main tabs:
- Block Tab: When you select any block in your content area, this tab displays all the specific customization options for that block (e.g., text color for a Paragraph block, image size for an Image block).
- Post/Page Tab (Document Tab): This tab contains settings for the entire post or page, such as:
- Status & Visibility: Publish status, who can see it.
- Permalinks: Your post’s URL slug.
- Categories & Tags: Organize your content.
- Featured Image: The main image representing your post/page.
- Excerpt: A summary of your content.
- Discussion: Allow/disallow comments.
- Page Attributes: (For pages) Parent page, template.
Your First Blocks: Adding and Managing Content
Let’s get hands-on and start adding some content!
### Adding a New Block
There are several easy ways to add a new block:
- Click the Block Inserter (+ icon):
- Click the + icon in the top toolbar or the small + icon that appears when you hover between blocks or at the bottom of your content.
- This opens a panel with categories of blocks (Text, Media, Design, Widgets, Embeds). You can search for specific blocks here.
- Type
/(Slash Command):- In an empty Paragraph block, or on a new line, simply type
/followed by the name of the block you want (e.g.,/image,/heading,/button). - This is a super-fast way to add blocks once you know their names.
- In an empty Paragraph block, or on a new line, simply type
- Drag-and-Drop from the Inserter:
- You can open the Block Inserter (the + icon), find your desired block, and then drag it directly into your content area.
### Common Blocks You’ll Use Constantly
Let’s explore some of the fundamental blocks that form the backbone of most web content:
- Paragraph Block: This is your default block for plain text. Just start typing, and WordPress will automatically create a Paragraph block.
- Heading Block: Essential for structuring your content and improving SEO. You can choose between H2, H3, H4, etc., to create a clear hierarchy.
-
Best Practice: Always use headings logically. An H1 is usually reserved for your page title, so start with H2s for major sections, then H3s for subsections, and so on.
-
- Image Block: Add images from your Media Library or upload new ones. You can add captions, alt text (crucial for accessibility and SEO), and adjust sizes.
- List Block: Create ordered (numbered) or unordered (bulleted) lists. Perfect for step-by-step instructions or itemizing points.
- Button Block: Design calls to action (CTAs) with customizable text, links, colors, and styles. This is a great example of how Gutenberg reduces the need for custom CSS for basic styling.
- Spacer Block: Adds vertical space between blocks. Useful for improving readability and visual flow.
- Separator Block: Adds a horizontal line to divide sections visually.
### Moving, Duplicating, and Deleting Blocks
Managing your blocks is just as easy as adding them:
- Select a Block: Click anywhere inside a block to select it. A toolbar will appear directly above or below it.
- Move Blocks:
- Use the Up/Down arrows in the block toolbar to move a block one position at a time.
- Click and drag the six-dot handle (drag icon) in the block toolbar to freely drag the block to a new position.
- Duplicate a Block:
- With the block selected, click the three vertical dots (Options) in the block toolbar.
- Select Duplicate. A copy of the block will appear right below the original.
- Delete a Block:
- With the block selected, click the three vertical dots (Options) in the block toolbar.
- Select Remove block.
Mastering Block Settings: Customizing Your Content
Once you’ve added blocks, the real fun begins: customization! Each block comes with its own set of unique options.
### Block Toolbar Settings
When you select a block, a contextual toolbar appears. This toolbar often contains quick settings relevant to that specific block type:
- Change Block Type: Allows you to transform one block into another compatible type (e.g., a Paragraph to a Heading, or a List to Paragraphs).
- Alignment: Text alignment (left, center, right) or block alignment (wide width, full width for some blocks like images or groups, if your theme supports it).
- Basic Formatting: Bold, italic, strikethrough, inline code, inline image.
- Link Icon: Add hyperlinks to text or images.
- More Options (three dots): Provides further actions like Copy, Duplicate, Insert Before/After, Add to Reusable blocks, and Remove block.
### Sidebar Settings
The Settings sidebar (remember the cog icon in the top toolbar if it’s hidden?) is where you’ll find the most extensive customization options for your selected block. These options are typically categorized into panels:
- Colors: For many blocks, you can set text color, background color, and link colors. This offers tremendous design flexibility without needing to touch CSS.
- Typography: Control font size, line height, letter spacing, and sometimes even font family (depending on your theme).
- Dimensions: Adjust padding and margin for blocks, giving you fine-tuned control over spacing. This is a powerful feature that used to require significant custom CSS knowledge.
- Settings Specific to the Block:
- For an Image block: alt text, image size, dimensions.
- For a Button block: link, open in new tab, style variations (e.g., filled, outline).
- For a Heading block: HTML tag (H2, H3, etc.).
- Advanced Panel: This section is usually present for all blocks and offers:
- HTML anchor: Allows you to create jump links within your page.
- Additional CSS class(es): A developer’s favorite! You can add custom CSS classes here and then write your own CSS code in your theme‘s Customizer or stylesheet to apply unique styles to specific blocks.
/* Example CSS for a custom class */
.my-custom-button {
    background-color: #ff6347; /* Tomato red */
    border-radius: 10px;
    padding: 15px 30px;
    font-size: 1.2em;
}
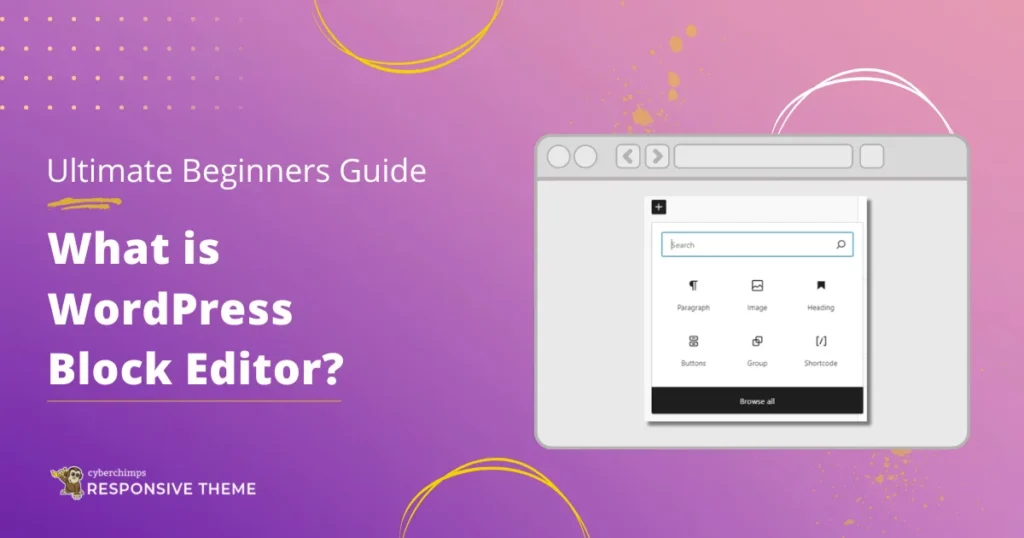
Image: Screenshot showing the Gutenberg sidebar with Block settings open, highlighting Typography, Color, and Dimensions panels.
Advanced Gutenberg Features for Smarter Building
Gutenberg isn’t just for basic text and images. It comes packed with powerful features that make content creation more efficient and your layouts more sophisticated.
### Reusable Blocks: Your Content Templates
Imagine you have a specific call-to-action, a disclaimer, or a signature block that you use on many posts. Instead of creating it from scratch every time, you can turn it into a Reusable Block.
-
Create a Reusable Block:
- Design any block or group of blocks exactly how you want it.
- Select the block(s).
- Click the three vertical dots (Options) in the block toolbar.
- Select Add to Reusable blocks.
- Give it a memorable name.
-
Use a Reusable Block:
- Add a new block using the + Block Inserter.
- Find your named reusable block under the “Reusable” section.
- Insert it into your content.
-
Manage Reusable Blocks:
- Go to WordPress Dashboard > Gutenberg > Reusable Blocks (or via the Options menu in the editor, then Manage all Reusable blocks).
- Here you can edit, delete, or export your reusable blocks.
Best Practice: Any change you make to a Reusable Block will update every instance of that block across your entire website. This is incredibly powerful for maintaining consistency!
### Block Patterns: Pre-designed Layouts
Block Patterns are similar to Reusable Blocks but are designed as starting points. They are pre-designed layouts of multiple blocks that you can insert and then customize without affecting other instances. Your theme or certain plugins might add their own patterns.
- Access Block Patterns: Click the + Block Inserter, then select the Patterns tab.
- Browse and Insert: Look through the categories (e.g., Buttons, Columns, Gallery) and click on a pattern to insert it.
- Customize: Once inserted, the pattern becomes a regular set of blocks that you can edit independently.
### Group and Column Blocks: Structuring Complex Layouts
These are game-changers for layout design:
- Group Block: Allows you to wrap multiple blocks inside a single container. This is useful for applying background colors, padding, or custom CSS to an entire section of content.
- Columns Block: Enables you to create multi-column layouts, just like you’d see in a magazine. You can choose different column ratios (e.g., 50/50, 30/70) and then place any other blocks inside each column. This helps avoid complex layout shortcodes that used to be prevalent with older page builder plugins.
### Embedding Content
Gutenberg makes embedding content from other platforms incredibly simple. Just paste the URL of a YouTube video, a tweet, an Instagram post, or a Spotify track into a Paragraph block, and Gutenberg will often automatically convert it into the correct embed block (thanks to oEmbed technology).
### The Code Editor
For those who are comfortable with HTML, Gutenberg offers a Code editor view.
-
Switch to Code Editor: Click the three vertical dots (Options) in the top toolbar.
-
Select Code editor.
This view shows you the raw HTML of your post. You can make direct edits here.
Warning: Use the Code editor with caution! Incorrect HTML can break your layout or even corrupt your content. It’s generally best for minor tweaks or troubleshooting.
Full Site Editing (FSE) & Block Themes: The Next Evolution
While this guide focuses on using Gutenberg for posts and pages, it’s important to know that Gutenberg’s capabilities are expanding. With Full Site Editing (FSE) and block themes (like the default Twenty Twenty-Four theme), you can use the Block Editor to design every part of your website, not just the content area.
You’ll find an Editor option under Appearance > Editor in your WordPress dashboard if you’re using a block theme. Here, you can customize your site’s header, footer, navigation menus, sidebar, and even theme templates using the same block-based interface. This introduces a powerful new era for WordPress design, allowing developers to define theme.json files to specify default block styles and settings, further simplifying site-wide design.
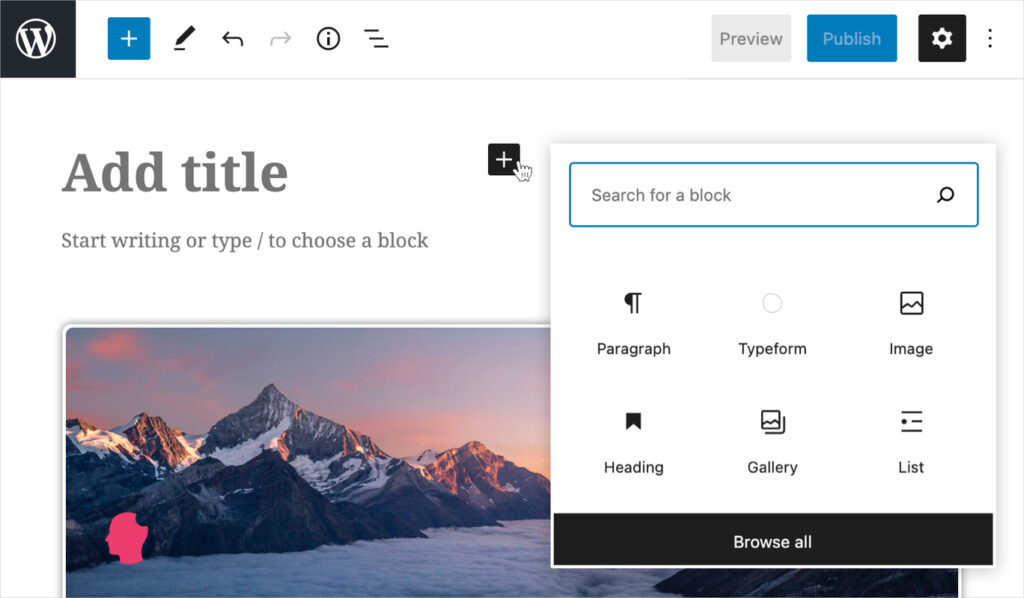
Image: Screenshot of the WordPress Full Site Editing interface, showing the site editor with global styles and template parts.
Troubleshooting Common Gutenberg Issues
Even with a friendly editor like Gutenberg, you might run into a snag or two. Here’s how to tackle some common problems:
### Missing Block Settings in the Sidebar
- Solution: Ensure the Settings cog in the top toolbar is toggled on. Also, make sure you have a block selected in your content area. If no block is selected, the sidebar will show document settings.
### Blocks Not Saving or Publishing (“Updating Failed”)
This is one of the most frequent issues, often indicating a problem on the server side or with your WordPress installation.
- Common Causes:
- Plugin Conflicts: A recently installed or updated plugin might be interfering with Gutenberg’s saving process. Try deactivating plugins one by one to identify the culprit.
- Server-Side Issues:
- PHP Memory Limit: WordPress might not have enough memory to save large posts. This often requires increasing your PHP memory limit via your
wp-config.phpfile or through your hosting provider’s control panel. - File Permissions: Incorrect file permissions can prevent WordPress from writing to the database.
- Mod_security: Some hosting providers have strict security rules that can block valid requests.
- PHP Memory Limit: WordPress might not have enough memory to save large posts. This often requires increasing your PHP memory limit via your
- Browser Cache: Clear your browser cache and cookies, or try saving in an incognito window.
- Troubleshooting Steps:
- Save a draft of your work locally (copy-paste to a text editor).
- Clear your browser cache.
- Deactivate all plugins and try saving again. If it works, reactivate plugins one by one to find the conflict.
- Contact your hosting provider. I’ve often seen “Updating Failed” relate to server-side PHP errors, which they can usually diagnose by checking your server logs.
### Layout Breaks or Unexpected Styling
- Cause: This could be due to your current theme (especially if it’s not fully Gutenberg-compatible), conflicts with custom CSS, or even malformed HTML if you’ve pasted content from other sources or used the Code editor.
- Solution:
- Test with a default WordPress theme (like Twenty Twenty-Four) to see if the issue persists.
- Check for custom CSS that might be overriding block styles.
- If you pasted content, try pasting it as plain text first or using the “Paste as plain text” option in the block toolbar.
### “This block has encountered an error and cannot be recovered.”
- Cause: Usually a plugin that provides the block is deactivated, uninstalled, or has a bug.
- Solution: Ensure all plugins that provide special blocks are active and updated. If the error persists, the plugin itself might need attention from its developers.
Best Practices for Using the Gutenberg Editor
To make the most of Gutenberg and keep your site running smoothly:
-
Best Practice: Always structure your content logically using Heading blocks (H2, H3, etc.). This isn’t just good for readability; it’s vital for SEO.
-
Best Practice: Utilize Group and Columns blocks for complex layouts. This keeps your content organized and often reduces the need for custom CSS.
-
Best Practice: Regularly preview your work before publishing. The “Preview” button in the top toolbar lets you see how your content will look on different devices.
-
Best Practice: Keep your WordPress core, theme, and all plugins updated. This prevents security vulnerabilities and ensures compatibility with the latest Gutenberg features.
-
Warning: Avoid pasting directly from Microsoft Word or Google Docs. These programs often carry over messy, invisible HTML formatting that can break your layout. Instead, paste into a plain text editor first, or use Gutenberg’s Paragraph block and then manually reformat.
-
Best Practice: Learn to use the Document Outline. It’s a quick way to review your content structure and ensure logical flow.
Conclusion: Embrace the Blocks!
Congratulations! You’ve just taken a significant step in mastering A Beginner’s Guide to the Gutenberg Block Editor. This editor is a powerful, flexible tool that empowers you to create stunning and structured content without needing to be a coding wizard. It truly embodies AskByteWise.com’s mission of “Making Complex Tech Simple.”
By understanding its interface, leveraging its blocks, and applying best practices, you’re well on your way to building a more engaging, professional, and SEO-friendly website. Gutenberg is constantly evolving, bringing more design freedom directly into your hands. Embrace the blocks, experiment, and watch your content come to life!
Next Steps:
- Experiment with More Blocks: Explore the Block Inserter. There are many more blocks than we covered here (e.g., Pullquote, Verse, Code, Shortcode, Table).
- Explore Block Themes and Full Site Editing: If your theme supports it, dive into Appearance > Editor to see how blocks are used to design your entire site.
- Check Out Gutenberg-Extending Plugins: Many plugins (like Kadence Blocks, GenerateBlocks, or Spectra) offer additional, highly customizable blocks and block patterns that significantly enhance Gutenberg’s capabilities.
- Consider Learning Basic CSS: While Gutenberg reduces the need for custom CSS, a fundamental understanding of CSS can unlock even deeper customization possibilities, especially when using the “Additional CSS class(es)” option.
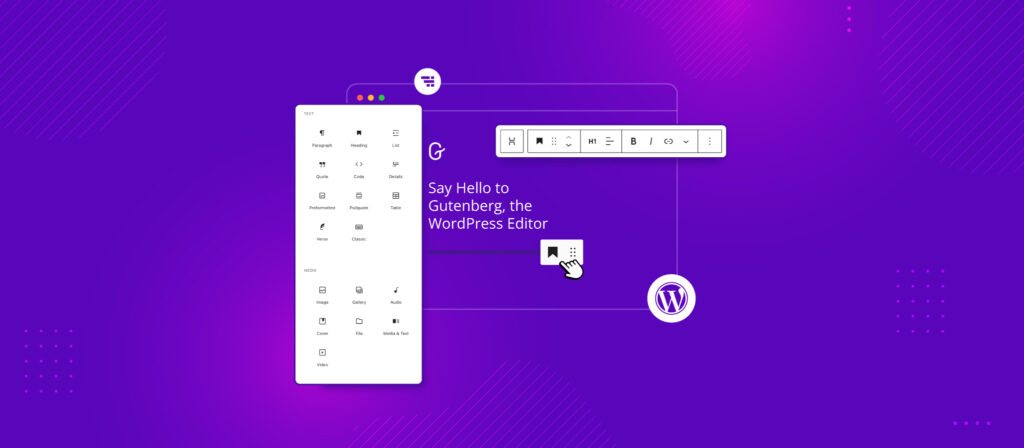
Image: A finished WordPress page showcasing a variety of Gutenberg blocks (e.g., heading, paragraph, image, button, columns) arranged in a visually appealing and well-structured layout.
Frequently Asked Questions (FAQ)
Q1: Can I still use the Classic Editor if I don’t like Gutenberg?
A: Yes! WordPress offers an official Classic Editor plugin that you can install and activate. This will revert your post and page editing experience back to the older editor. However, I strongly encourage you to give Gutenberg a proper try, as it’s the future of WordPress.
Q2: Will Gutenberg break my old content created with the Classic Editor?
A: No, it won’t. When you open an old post or page in Gutenberg, WordPress automatically places all the content into a single “Classic” block. You can then choose to convert this Classic block into individual Gutenberg blocks, or just leave it as is.
Q3: Is Gutenberg good for SEO?
A: Absolutely! Gutenberg encourages structured content through the use of Heading blocks, lists, and clear paragraphs. This semantic structure is highly favored by search engines, making it easier for them to understand and rank your content. It also makes content more readable for users, which indirectly helps SEO.
Q4: How does Gutenberg interact with page builder plugins like Elementor or Beaver Builder?
A: Page builder plugins typically offer their own content creation interfaces that bypass or integrate differently with Gutenberg. You can often choose to edit a page with either Gutenberg or your preferred page builder. While they can coexist, for a single page, you usually stick to one or the other to avoid conflicts. Gutenberg serves as the default editor, while page builders offer more advanced design and layout options often for landing pages or complex designs, though Gutenberg’s capabilities are rapidly catching up.
Q5: I’m getting a “Block validation failed” error. What does that mean?
A: This error usually occurs if the HTML of a block was manually edited (e.g., in the Code editor) and then changed in a way that makes it inconsistent with the block’s expected structure. You can often resolve it by clicking “Attempt Block Recovery” or, if that doesn’t work, manually reverting the HTML or recreating the block. This highlights the importance of using the Code editor carefully.
See more: A Beginner's Guide to the Gutenberg Block Editor.
Discover: AskByteWise.