Welcome to AskByteWise.com! I’m Noah Evans, and today we’re tackling a crucial, yet often overlooked, aspect of website optimization: Technical SEO. If you’ve ever wondered how Google, Bing, and other search engines find, understand, and rank your website, then understanding What is Technical SEO? The Basics Explained is your starting point. This guide is crafted for DIY website builders, beginner developers, and anyone managing their own site who wants to improve its performance in search results without needing a computer science degree. We’ll break down complex concepts into simple, actionable steps, ensuring your website is not just pretty, but also search-engine friendly and genuinely helpful to your users.
Before You Begin: Essential Tools & Mindset
Before we dive into the nitty-gritty of Technical SEO, let’s ensure you have a few things ready. These aren’t just prerequisites; they’re your toolkit for success.
- Access to Your Website’s Backend:
- WordPress Dashboard: For most of our examples, we’ll assume you’re using WordPress. You’ll need administrator access.
- cPanel/Hosting Control Panel: Access to your hosting account will be necessary for tasks like managing SSL certificates,
robots.txtfiles, or checking server logs. - FTP/SFTP Client (e.g., FileZilla): Sometimes you’ll need to directly access your website’s files.
- A Backup Strategy: Before making any significant changes to your website’s core files or database, always, always create a full backup. Many WordPress plugins like UpdraftPlus or Duplicator can help with this, or your hosting provider might offer backup solutions.
Warning: Modifying core files without a backup can lead to a broken website. Better safe than sorry!
- Google Search Console Account: This free tool from Google is your window into how Google views your site. It’s essential for monitoring crawl errors, index status, and other vital Technical SEO metrics.
- Patience and a Learning Mindset: Technical SEO can seem daunting, but it’s a skill you build over time. Don’t be afraid to experiment, test, and learn!
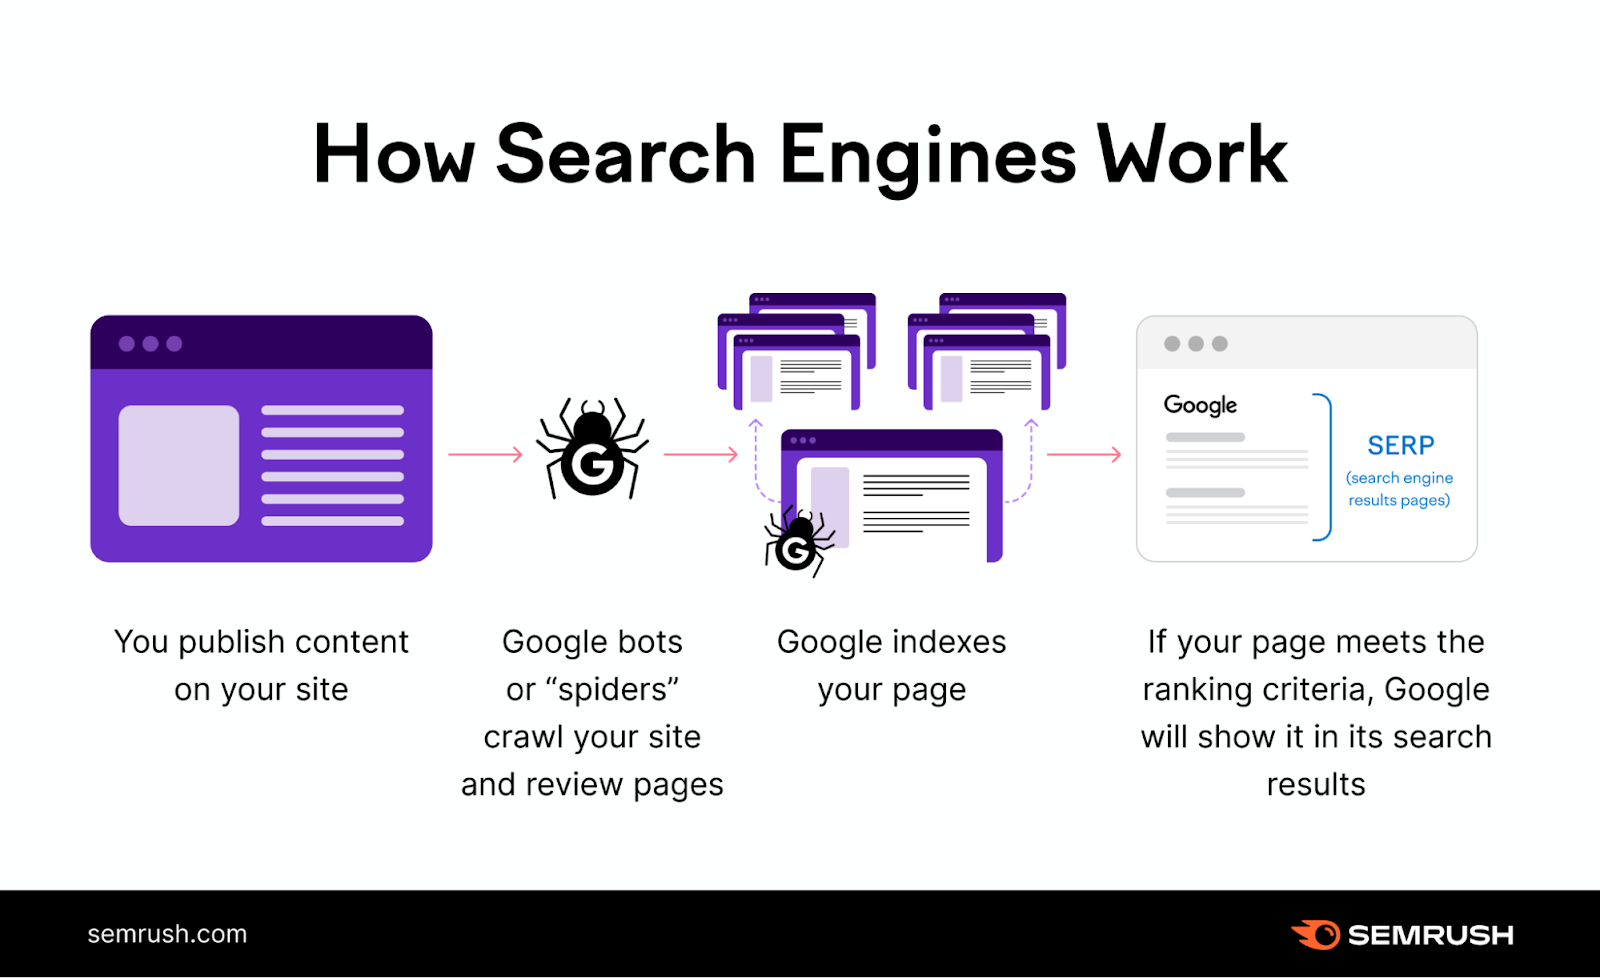
Understanding Crawlability and Indexability: The Foundation of Technical SEO
At its core, Technical SEO is about helping search engine robots (called “crawlers” or “spiders”) find, understand, and store your website’s content. This involves two primary concepts: crawlability and indexability.
- Crawlability: Can search engines access and read your website’s pages?
- Indexability: Once crawled, can search engines understand and add your pages to their vast index (their library of all known web pages)?
If your site isn’t crawlable or indexable, it won’t appear in search results, no matter how great your content is.
1. Optimizing Your robots.txt File
The robots.txt file is a small text file that lives in the root directory of your website. It acts as a set of instructions for search engine crawlers, telling them which parts of your site they can and cannot crawl.
How to Find and Edit robots.txt:
- Via Hosting cPanel (Recommended):
- Log into your hosting provider’s control panel (e.g., cPanel).
- Navigate to File Manager.
- Go to your public HTML directory (often
public_htmlorwww). - Look for a file named
robots.txt. If it doesn’t exist, you can create one.
- Via FTP Client:
- Connect to your website using an FTP client like FileZilla.
- Navigate to your site’s root directory.
- Download
robots.txt, edit it, then upload it back.
- Using WordPress SEO Plugins:
- Plugins like Yoast SEO or Rank Math allow you to edit your
robots.txtdirectly from your WordPress dashboard. - For Yoast SEO: Go to SEO > Tools > File editor.
- For Rank Math: Go to Rank Math > General Settings > Edit Robots.txt.
- Plugins like Yoast SEO or Rank Math allow you to edit your
Basic robots.txt Directives:
Here’s a common robots.txt example and what it means:
User-agent: *
Disallow: /wp-admin/
Allow: /wp-admin/admin-ajax.php

Sitemap: https://www.yourwebsite.com/sitemap_index.xml-
User-agent: *: This line means the rules below apply to all search engine crawlers. You can specify individual crawlers (e.g.,User-agent: Googlebot). -
Disallow: /wp-admin/: This tells crawlers not to access the/wp-admin/directory, which contains your WordPress dashboard and other sensitive files. This is a crucial Technical SEO best practice. -
Allow: /wp-admin/admin-ajax.php: This specific rule allows Google to crawl theadmin-ajax.phpfile, which is often used by themes and plugins and needs to be accessible for proper functionality. -
Sitemap: https://www.yourwebsite.com/sitemap_index.xml: This line points search engines directly to your XML sitemap, making it easier for them to discover all your important pages.Best Practice: Don’t use
Disallowfor pages you want to keep private but still crawlable (e.g., a “thank you” page after a purchase). For those, use anoindextag, which we’ll discuss next.robots.txtshould only be used to manage crawl budget, not to hide content from the index.
2. Crafting and Submitting an XML Sitemap
An XML sitemap is essentially a roadmap for search engines. It lists all the important pages and posts on your website that you want them to crawl and index. While crawlers can find pages by following links, a sitemap ensures they don’t miss anything crucial.
How to Generate and Submit an XML Sitemap:
- Generate with a Plugin (WordPress):
- Yoast SEO and Rank Math automatically generate XML sitemaps for you.
- For Yoast SEO: Go to SEO > General > Features and ensure “XML sitemaps” is enabled. You’ll find the link to your sitemap (e.g.,
yourwebsite.com/sitemap_index.xml) there. - For Rank Math: Go to Rank Math > Sitemap Settings.
- Submit to Google Search Console:
- Log into your Google Search Console account.
- In the left-hand menu, click Sitemaps.
- Enter the URL of your XML sitemap (e.g.,
sitemap_index.xml) in the “Add a new sitemap” field and click Submit.
This step is vital for Technical SEO as it directly informs Google about all the pages you want them to know about, speeding up the indexing process.
Enhancing Site Speed and Core Web Vitals: A User-First Approach
In today’s fast-paced digital world, users expect websites to load instantly. Google, recognizing this, has made page speed a significant ranking factor, especially with the introduction of Core Web Vitals. Optimizing site speed is a cornerstone of effective Technical SEO.
What are Core Web Vitals?
Core Web Vitals are a set of three specific metrics that Google uses to measure user experience:
- Largest Contentful Paint (LCP): Measures loading performance. The ideal LCP occurs within 2.5 seconds of when the page first starts loading.
- First Input Delay (FID): Measures interactivity. The ideal FID is less than 100 milliseconds. (Note: FID will be replaced by INP – Interaction to Next Paint – in March 2024, which measures overall page responsiveness).
- Cumulative Layout Shift (CLS): Measures visual stability. The ideal CLS is less than 0.1.
1. Optimizing Images
Images often account for a large portion of a page’s total file size. Proper image optimization is a quick win for site speed.
Steps for Image Optimization:
- Compress Images:
- Before uploading, use image compression tools (e.g., TinyPNG, Squoosh) or plugins (e.g., Smush, Imagify) to reduce file size without significant loss of quality.
- Choose the Right Format:
- JPEG: Best for photographs and images with many colors.
- PNG: Best for images with transparency, logos, or line art.
- WebP: A modern format offering superior compression. Many plugins can convert your images to WebP automatically.
- Serve Scaled Images:
- Upload images at their maximum required size, then use CSS or HTML attributes to display them at smaller dimensions. Don’t upload a 4000px image if it will only ever be displayed at 800px.
- Lazy Load Images:
- Lazy loading defers the loading of images that are “below the fold” (not visible on the initial screen) until the user scrolls down. WordPress 5.5+ has native lazy loading, but plugins like WP Rocket or LiteSpeed Cache offer more robust options.
2. Minifying CSS and JavaScript
Minification removes unnecessary characters (like whitespace, comments) from your CSS and JavaScript files, reducing their file size and speeding up load times.
How to Minify Files (WordPress):
-
Use a Caching Plugin:
- Plugins like WP Rocket, LiteSpeed Cache, or W3 Total Cache have options to automatically minify CSS and JavaScript files.
- Navigate to the plugin’s settings (e.g., WP Rocket > File Optimization) and enable options for CSS and JavaScript minification and combination.
Warning: Minifying and combining files can sometimes break your site’s design or functionality due to conflicts. Always test thoroughly after enabling these features, and be ready to revert if necessary.
3. Leveraging Browser Caching
Browser caching stores static assets (like images, CSS, JS) locally on a user’s computer after their first visit. This means subsequent visits to your site will load much faster, as the browser doesn’t need to re-download everything.
How to Implement Browser Caching:
-
Via Caching Plugin (WordPress):
- Again, WP Rocket, LiteSpeed Cache, or W3 Total Cache are your best friends. They usually handle browser caching automatically when activated.
-
Manually via
.htaccess(Advanced):- Access your site’s root directory via FTP or cPanel File Manager.
- Edit the
.htaccessfile (make a backup first!). - Add the following code snippet:
<IfModule mod_expires.c>
  ExpiresActive On
  ExpiresByType image/jpg "access 1 year"
  ExpiresByType image/jpeg "access 1 year"
  ExpiresByType image/gif "access 1 year"
  ExpiresByType image/png "access 1 year"
  ExpiresByType image/webp "access 1 year"
  ExpiresByType text/css "access 1 month"
  ExpiresByType application/javascript "access 1 month"
  ExpiresByType application/pdf "access 1 month"
  ExpiresByType text/x-javascript "access 1 month"
  ExpiresByType application/x-shockwave-flash "access 1 month"
  ExpiresByType image/x-icon "access 1 year"
  ExpiresDefault "access 2 days"
</IfModule>
This code tells the browser to cache different file types for specific durations.
4. Choosing a Fast Web Host & CDN
Your hosting provider plays a massive role in your site’s speed. Cheap hosting often means slow servers.
-
Invest in Quality Hosting: Shared hosting can be slow. Consider a VPS (Virtual Private Server) or managed WordPress hosting for better performance.
-
Use a CDN (Content Delivery Network): A CDN (like Cloudflare or KeyCDN) stores copies of your site’s static content on servers distributed globally. When a user requests your site, the content is delivered from the nearest server, drastically reducing load times.
Best Practice: Think of a CDN like having multiple storefronts for your business around the world. No matter where your customer is, they can quickly access your products (website content) from a nearby location instead of waiting for it to be shipped from one central warehouse.
Securing Your Site with HTTPS
HTTPS (Hypertext Transfer Protocol Secure) is a secure version of HTTP. It encrypts the connection between your user’s browser and your website, protecting sensitive data. Google explicitly states that HTTPS is a ranking signal, and browsers now flag HTTP sites as “Not Secure.” This is a non-negotiable part of modern Technical SEO.
1. Obtaining and Installing an SSL Certificate
An SSL (Secure Sockets Layer) certificate is what enables HTTPS.
Steps to Implement HTTPS:
-
Get an SSL Certificate:
- Many hosting providers offer free SSL certificates (e.g., Let’s Encrypt) with their plans. You can usually activate it from your cPanel or hosting dashboard.
- If not free, you can purchase one from your host or a third-party vendor.
-
Install the SSL Certificate:
- Your hosting provider typically handles the installation.
-
Update WordPress URL Settings:
- Once SSL is installed, go to your WordPress dashboard: Settings > General.
- Change both “WordPress Address (URL)” and “Site Address (URL)” from
http://yourwebsite.comtohttps://yourwebsite.com.
-
Implement a 301 Redirect:
- You need to redirect all old HTTP traffic to the new HTTPS version.
- Via Plugin: Plugins like Really Simple SSL can do this automatically.
- Manually via
.htaccess: Add this code to your.htaccessfile (above any existing WordPress rules):
RewriteEngine On RewriteCond %{HTTPS} off RewriteRule ^(.*)$ https://%{HTTP_HOST}%{REQUEST_URI} [L,R=301] -
Update Internal Links and Assets:
- After moving to HTTPS, you might encounter “mixed content” warnings (where some assets like images or CSS are still loading over HTTP).
- Use a plugin like Better Search Replace to find and replace all instances of
http://yourwebsite.comwithhttps://yourwebsite.comin your database. - Manually check your theme files (e.g., header.php, footer.php) and CSS for any hardcoded HTTP links.
Optimizing for Mobile-Friendliness
Mobile devices now account for the majority of web traffic. Google’s “mobile-first indexing” means it primarily uses the mobile version of your content for indexing and ranking. A mobile-friendly website is essential for Technical SEO.
1. Responsive Design
The best approach is a responsive design, where your website automatically adjusts its layout and elements to fit any screen size.
How to Ensure Mobile-Friendliness:
- Choose a Responsive WordPress Theme: Most modern WordPress themes are responsive by default. If your theme isn’t, consider switching to one that is.
- Test Your Site:
- Use Google’s Mobile-Friendly Test tool.
- Regularly check your site on various devices (phones, tablets) or use your browser’s developer tools (right-click > Inspect > Toggle device toolbar).
- Optimize Touch Elements: Ensure buttons and links are large enough and spaced far enough apart for easy tapping on touchscreens.
Implementing Structured Data (Schema Markup)
Structured data, or Schema Markup, is a standardized format for providing information about your website to search engines. It helps search engines understand the context of your content, leading to richer results (known as “rich snippets”) in SERPs. This is a powerful Technical SEO technique.
What is Schema Markup?
Imagine you have a recipe page. Without Schema, Google just sees text and images. With Schema, you can tell Google: “This is a recipe for ‘Chocolate Chip Cookies,’ it takes ’30 minutes’ to prepare, has ‘5 stars’ from users, and the main ingredient is ‘flour.'”
How to Add Structured Data:
-
Via SEO Plugins (WordPress – Easiest):
- Yoast SEO and Rank Math have built-in Schema capabilities.
- For Yoast SEO: In the block editor for a page/post, go to the Yoast SEO sidebar, then Schema tab, and select the appropriate Schema type (e.g., Article, FAQ, Product).
- For Rank Math: In the block editor, click the Rank Math icon, go to Schema (Structured Data), and choose a Schema type. It often auto-detects.
-
Manually using JSON-LD (Advanced):
- For specific custom requirements, you can add JSON-LD (JavaScript Object Notation for Linked Data) code directly to your site.
- You can generate this code using tools like Google’s Structured Data Markup Helper.
- To add it in WordPress, you can insert it into your theme’s header.php (for site-wide schema) or use a custom function in functions.php to inject it conditionally for specific post types or pages.
<script type="application/ld+json">
{
  "@context": "https://schema.org",
  "@type": "Article",
  "headline": "What is Technical SEO? The Basics Explained",
  "image": [
    "https://www.askbytewise.com/images/technical-seo-basics-explained.jpg"
   ],
  "author": {
    "@type": "Person",
    "name": "Noah Evans"
  },
  "publisher": {
    "@type": "Organization",
    "name": "AskByteWise.com",
    "logo": {
      "@type": "ImageObject",
      "url": "https://www.askbytewise.com/images/askbytewise-logo.png"
    }
  },
  "datePublished": "2023-10-27"
}
</script>
Best Practice: Always test your structured data using Google’s Rich Results Test tool to ensure it’s valid and correctly implemented. Incorrect Schema can be ignored or even penalized.
Managing Duplicate Content with Canonical Tags
Duplicate content occurs when the same or very similar content is accessible from multiple URLs. This can confuse search engines, as they don’t know which version to index or rank, potentially diluting your SEO efforts. Canonical tags are a key Technical SEO solution.
1. Implementing the rel="canonical" Tag
A canonical tag (rel="canonical") is an HTML tag that tells search engines which version of a URL is the “master” or preferred version.
Example:
If you have these URLs for the same content:
https://www.yourwebsite.com/my-awesome-post/https://www.yourwebsite.com/my-awesome-post/?source=facebookhttps://www.yourwebsite.com/category/posts/my-awesome-post/
You would place the following tag in the <head> section of all duplicate pages, pointing to your preferred URL:
<link rel="canonical" href="https://www.yourwebsite.com/my-awesome-post/" />How to Implement Canonical Tags (WordPress):
-
Via SEO Plugins:
- Yoast SEO and Rank Math automatically handle canonical tags for most pages and posts, pointing to the self-referencing canonical (the page itself).
- If you need to set a custom canonical URL (e.g., for duplicate content from another site or a slightly different page), you can do so in the plugin’s advanced settings for that specific page/post.
- For Yoast SEO: Edit a post/page, go to the Yoast SEO sidebar, Advanced tab, and enter the canonical URL in the “Canonical URL” field.
- For Rank Math: Edit a post/page, go to the Rank Math sidebar, Advanced tab, and enter the canonical URL in the “Canonical URL” field.
Warning: Be careful when using custom canonical tags. Pointing to the wrong URL can de-index your content. Use them only when you fully understand the implications.
Troubleshooting Common Technical SEO Issues
Even with the best intentions, things can go wrong. Here are a few common issues and how to troubleshoot them.
1. My Page Isn’t Showing in Google!
- Check Google Search Console: Is the page excluded? Look for “Noindex,” “Blocked by
robots.txt,” “Crawl anomaly,” or “Not found (404)” errors under Pages > Not Indexed. - Inspect URL: Use the “URL Inspection” tool in Search Console to see how Google last crawled and indexed the page. It will tell you if it’s indexed, if there are
noindexdirectives, orrobots.txtblocks. - Check
robots.txt: Ensure you haven’t accidentally disallowed the page or its containing directory. - Check
noindextag: Look in the page’s HTML<head>section for<meta name="robots" content="noindex, follow" />. If found, remove it (usually controlled by your SEO plugin or theme settings).
2. My Site is Slow!
- Page Speed Insights: Use Google’s PageSpeed Insights to get a detailed report on your site’s performance and specific recommendations.
- Caching Plugin: Double-check if your caching plugin is active and configured correctly. Clear all caches.
- Image Optimization: Are all your images optimized?
- Excessive Plugins: Too many plugins, or poorly coded ones, can drastically slow down your site. Deactivate plugins one by one to identify the culprit.
- Hosting: If everything else is optimized and your site is still slow, your hosting might be the bottleneck.
3. Mixed Content Warnings After HTTPS Migration
- Inspect Element: In your browser, right-click on your page and select “Inspect” (or “Inspect Element”). Go to the “Console” tab. Look for warnings or errors related to mixed content (e.g., “Mixed Content: The page at ‘https://…’ was loaded over HTTPS, but requested an insecure image ‘http://…'”).
- Database Search & Replace: Use a plugin like Better Search Replace to find all instances of
http://yourwebsite.comand replace them withhttps://yourwebsite.comin your database. - Theme/Plugin Files: Manually check your theme’s CSS and JavaScript files for any hardcoded HTTP URLs for assets.
Conclusion: Your Journey to Better Technical SEO
Phew! That was a deep dive into What is Technical SEO? The Basics Explained. We’ve covered a lot of ground, from making your site crawlable and indexable to speeding it up, securing it, and making it smarter for search engines with structured data. Remember, Technical SEO isn’t a one-time setup; it’s an ongoing process of maintenance and improvement. By consistently applying these principles, you’re not just pleasing search engines; you’re creating a faster, more secure, and more user-friendly experience for everyone who visits your site. This commitment to quality and attention to detail is how you build a truly authoritative and trustworthy online presence.
Next Steps: Keep Learning and Testing!
- Monitor Google Search Console: Regularly check for new errors or warnings.
- Stay Updated: Search engine algorithms and best practices evolve. Follow reputable SEO blogs (like AskByteWise!) and Google’s official announcements.
- Audit Your Site Periodically: Use tools like Semrush Site Audit, Ahrefs Site Audit, or even free tools like Screaming Frog SEO Spider (for smaller sites) to identify new technical issues.
- Experiment and Test: Don’t be afraid to try new plugins or optimization techniques, but always do so with a backup in hand and monitor the results.
Frequently Asked Questions (FAQ)
Q1: What’s the difference between On-Page SEO and Technical SEO?
A1: On-Page SEO focuses on the content and visibility of elements on your actual web pages – things like keyword usage, title tags, meta descriptions, headings, image alt text, and the quality of the written content itself. Technical SEO, on the other hand, deals with the underlying infrastructure of your website – how search engines crawl, index, and render your site. It’s about ensuring your site’s foundation is solid so that your on-page efforts can shine.
Q2: Do I need to be a developer to do Technical SEO?
A2: Not necessarily! While a basic understanding of HTML, CSS, and how a web server works can be beneficial, many Technical SEO tasks can be managed through user-friendly interfaces like WordPress plugins (e.g., Yoast SEO, Rank Math, WP Rocket) or your hosting control panel. For more complex issues, you might need to consult a developer, but this guide aims to empower beginners to handle a significant portion themselves.
Q3: How often should I check my Technical SEO?
A3: It’s good practice to perform a Technical SEO audit at least quarterly, or after any major website change (e.g., changing themes, installing new plugins, migrating hosts). You should check your Google Search Console regularly (weekly or bi-weekly) for any new critical errors that Google might report. Maintaining good technical health is an ongoing process, not a one-time fix.
Q4: Can poor Technical SEO hurt my rankings?
A4: Absolutely! If search engines can’t effectively crawl and index your site (due to robots.txt blocks, noindex tags, or poor site structure), your content won’t appear in search results at all. Slow page speed, lack of HTTPS, and a non-mobile-friendly site can lead to lower rankings, higher bounce rates, and a poor user experience, all of which negatively impact your visibility. Good Technical SEO is a fundamental requirement for ranking success.
See more: What is Technical SEO? The Basics Explained.
Discover: AskByteWise.