
Welcome to AskByteWise.com, where we make complex tech simple! If you’ve launched a website and are wondering how to get it noticed by search engines like Google, you’re in the right place. Search Engine Optimization (SEO) can seem daunting, but with the right tools, it becomes manageable. Today, we’re diving deep into Yoast SEO for Beginners: How to Set It Up Correctly. This comprehensive guide will walk you through every essential step, ensuring your WordPress site has a solid foundation for better search rankings and visibility, even if you’re a complete novice. Let’s get your site optimized!
Before You Begin: Essential Prerequisites
Before we jump into configuring Yoast SEO, there are a few things you should have in place. Think of these as the building blocks for a successful SEO strategy:
- A Live WordPress Website: This tutorial assumes you already have WordPress installed and accessible via your web browser. If not, your hosting provider can typically help you get set up quickly.
- Administrator Access: You’ll need full administrator privileges to install plugins and change core settings within your WordPress dashboard.
- Basic Understanding of Your Website’s Purpose: What is your site about? Who is your target audience? What keywords do you want to rank for? Having a clear idea helps you optimize your content effectively.
- A Few Pieces of Content: While not strictly necessary for setup, having a few posts or pages (even drafts) will give you something to practice optimizing with the Yoast SEO plugin.
- An Open Mind: SEO is an ongoing process, not a one-time fix. Be prepared to learn and adapt!
Step 1: Installing and Activating the Yoast SEO Plugin
The first step is to get Yoast SEO onto your WordPress site. It’s a straightforward process, just like installing any other plugin.
- Log in to your WordPress Dashboard: Navigate to
yourdomain.com/wp-adminand enter your credentials. - Go to Plugins > Add New: On the left-hand sidebar, hover over Plugins and click on Add New.
- Search for “Yoast SEO”: In the search bar on the top right, type “Yoast SEO” and press Enter. The official Yoast SEO plugin, developed by Team Yoast, should appear as the first result.
- Click “Install Now”: Once you’ve located the plugin, click the Install Now button. WordPress will download and install the plugin files.
- Click “Activate”: After the installation is complete, the “Install Now” button will change to “Activate.” Click it to activate the plugin.
Best Practice: Always install plugins from the official WordPress plugin directory or reputable sources. This helps ensure security and compatibility with your WordPress core and theme.
Once activated, you’ll see a new Yoast SEO menu item appear in your WordPress dashboard sidebar. This signifies that the plugin is ready to be configured.
Step 2: Running the First-Time Configuration Wizard
Yoast SEO makes initial setup incredibly easy with its “First-time Configuration” wizard. This wizard guides you through essential settings, establishing a solid SEO foundation.
-
Access the Configuration Wizard:
- Go to Yoast SEO > General in your WordPress dashboard.
- You should see a notification box at the top inviting you to “Start first-time configuration.” Click on “Start first-time configuration” or the “Configuration wizard” tab.
-
Follow the Steps of the Wizard:
- Step 1: Environment: This usually checks if your site is ready for search engines. Select “My site is live and ready to be indexed.” (Unless it’s a development site, in which case select the other option, but remember to change it when you go live!)
- Step 2: Site Type: Choose the type of site you have. Is it a blog, an online shop, a portfolio, or something else? This helps Yoast SEO generate appropriate Schema Markup for your site.
- Step 3: Organization or Person:
- Organization: If your site represents a company or brand, select “Organization.” Enter your Organization name and upload your Organization logo. This information is used in Schema Markup to tell search engines more about your entity.
- Person: If your site represents an individual (e.g., a personal blog or portfolio), select “Person” and choose the user profile associated with it.
- Step 4: Search Engine Visibility: Here, Yoast SEO asks if you want your posts, pages, and other content types to be visible in search results. For most websites, you want everything to be visible. So, keep them all enabled.
- Step 5: Multiple Authors: If your site has multiple authors, select “Yes.” Yoast SEO will then prevent author archives from being indexed if there’s only one author, avoiding duplicate content issues.
- Step 6: Google Search Console: If you’ve already verified your site with Google Search Console, you can paste the verification code here. If not, don’t worry, you can do this later or verify directly through Google Search Console. (We highly recommend setting up Search Console – it’s a free and powerful tool from Google to monitor your site’s performance in search).
- Step 7: Title Settings: This is where you set the default separator for your page titles (e.g.,
|or-). Choose one that you like and is easy to read. - Step 8: Help us improve Yoast SEO (optional): You can opt-in or out of tracking anonymous data.
- Step 9: Success! The wizard is complete. Click “Go to your dashboard” to finish.
Congratulations! You’ve just completed the initial setup of Yoast SEO for Beginners: How to Set It Up Correctly. Now, let’s refine some of the more detailed settings.
Step 3: Configuring General Settings
Even after the wizard, there are a few important settings under the Yoast SEO > General section that are worth reviewing.
3.1. Dashboard Tab
The dashboard tab provides a quick overview of any SEO problems or notifications Yoast SEO has for your site. Pay attention to these and address any critical issues it highlights. For example, it might warn you about “Noindex” settings if your site is set not to be indexed.
3.2. Features Tab
This is where you can enable or disable various features of Yoast SEO. For most beginners, it’s best to leave the default settings as they are, as they provide a comprehensive set of tools. However, here are a few to note:
- SEO Analysis & Readability Analysis: Absolutely keep these on! They provide the traffic light system (green, orange, red) feedback in your post/page editor.
- XML Sitemaps: Crucial for SEO. Keep this enabled. Yoast SEO automatically generates and updates your XML sitemap, which helps search engines discover your content. You can view your sitemap by clicking the question mark icon and then “See the XML sitemap.”
- Ryte Integration: This service checks if your site is indexed by search engines. Keep it enabled.
- Usage Tracking: You can disable this if you don’t want to share anonymous usage data.
- REST API: Headless Features: Only enable this if you’re running a headless WordPress setup. For a standard WordPress site, leave it off.
Warning: Be cautious when disabling features like XML Sitemaps or SEO Analysis, as they are core to Yoast SEO’s functionality and your site’s discoverability.
Step 4: Mastering Search Appearance (Crucial for E-E-A-T!)
The Search Appearance section (under Yoast SEO > Search Appearance) is perhaps the most critical area for setting up Yoast SEO for Beginners: How to Set It Up Correctly. This is where you control how your content appears in search results and ensure search engines understand your site’s structure.
4.1. General Tab
- Separator Character: Choose your preferred separator (e.g.,
–or|). This is used in your page titles in search results. - Knowledge Graph & Schema.org: This repeats the Organization/Person settings from the wizard. Ensure your name/organization and logo are correct. This information helps search engines display your site more prominently in rich results and knowledge panels, boosting your E-E-A-T.
4.2. Content Types Tab
This section allows you to configure SEO settings for different types of content on your site, such as Posts, Pages, and any custom post types your theme or other plugins might introduce (e.g., “Products” for WooCommerce).
For each content type:
- “Show [Content Type] in search results?”: Keep this Yes for content you want indexed.
- “Show SEO Settings for [Content Type]?”: Keep this Yes to have the Yoast SEO meta box appear on individual post/page edit screens.
- SEO Title Template: This defines the default structure for your titles in search results. Yoast uses “variables” (e.g.,
%%title%%,%%sitename%%).- A common and effective structure is:
%%title%% %%page%% %%sep%% %%sitename%% - This translates to: “Your Post Title | AskByteWise.com”
- E-E-A-T Tip: Make sure your site name is included for branding and authority.
- A common and effective structure is:
- Meta Description Template: This defines the default description shown under your title in search results.
- A good default could be:
%%excerpt%%(uses your post’s excerpt) or%%sitename%% - %%sitedesc%%(uses your site’s tagline). - You’ll often want to customize this for individual posts/pages, but a good default provides a fallback.
- A good default could be:
Best Practice: While default templates are great, always customize the SEO title and meta description for your most important posts and pages from within the Yoast SEO meta box when you’re editing them. This gives you maximum control over how they appear in search results, helping you attract more clicks.
4.3. Media Tab
- “Redirect attachment URLs to the attachment itself?”: Keep this enabled and set to Yes. When you upload an image, WordPress creates a separate “attachment page” for it. These pages often have minimal content and can cause duplicate content issues. Redirecting them to the media file itself or the post they’re embedded in is crucial for SEO and prevents Google from indexing low-value pages. This is a common WordPress and SEO pitfall, and Yoast handles it elegantly.
4.4. Taxonomies Tab
This section covers categories, tags, and any custom taxonomies.
- “Show Categories/Tags in search results?”:
- For Categories, it’s generally Yes. Categories are often well-organized and can serve as useful landing pages for users and search engines.
- For Tags, it’s often better to set this to No if you use many tags or tags that are very similar to each other. Too many similar tag archives can lead to thin content and duplicate content issues, which can hurt your ranking. Only index tags if they truly add unique value and contain substantial content.
- SEO Title Template & Meta Description Template: Similar to content types, set default templates.
4.5. Archives Tab
This controls how author archives, date archives, and special pages behave.
- Author Archives: If you’re the sole author of your site, set “Show Author archives in search results?” to No. Indexing an author archive for a single author creates a near-duplicate of your main blog page, which can confuse search engines. If you have multiple authors, then set it to Yes.
- Date Archives: Generally, set “Show Date archives in search results?” to No. Date-based archives rarely provide unique value to users and can also lead to duplicate content.
- Special Pages: Don’t change the settings for Search pages or 404 pages. Yoast SEO has good defaults here.
4.6. Breadcrumbs Tab
-
Enable Breadcrumbs: Enable this if your theme supports it (many modern themes do). Breadcrumbs provide a clear navigational path for users (e.g., Home > Blog > Category > Post Title) and help search engines understand your site structure.
-
Integrate with your theme: Yoast provides a code snippet you can add to your theme‘s
functions.phpfile or a template file if your theme doesn’t automatically display breadcrumbs.<?php if ( function_exists('yoast_breadcrumb') ) { yoast_breadcrumb( '<p id="breadcrumbs">','</p>' ); } ?>Warning: Modifying theme files, especially
functions.php, requires caution. Always make a backup of your file before editing. If you’re unsure, consult your theme documentation or a developer.
Step 5: Utilizing Yoast SEO Tools
Under Yoast SEO > Tools, you’ll find a few utilities that can be incredibly helpful for managing your site’s SEO.
5.1. Import and Export
If you’re moving from another SEO plugin or want to transfer your Yoast SEO settings to another site, this tool is invaluable. You can import settings from other plugins or export your current Yoast SEO settings for backup or migration.
5.2. File Editor
This tool allows you to directly edit your robots.txt and .htaccess files. These are powerful files that control how search engines crawl your site and how your server handles requests.
- robots.txt: This file tells search engine bots which parts of your site they are allowed or not allowed to crawl.
- Example
robots.txtentry to disallow crawling of a specific directory:User-agent: * Disallow: /wp-admin/ Disallow: /wp-includes/(Note: Yoast SEO typically manages core WordPress directories correctly).
- Example
- .htaccess: This file is used for server-level configurations, such as redirects, custom error pages, and security settings.
- Example
.htaccessentry for a 301 redirect:Redirect 301 /old-page.html https://www.yourdomain.com/new-page/
- Example
Warning: Be extremely careful when editing
robots.txtor.htaccess. Incorrect changes can break your site or severely impact its search engine visibility. For beginners, it’s generally safer to avoid direct editing of these files unless you know exactly what you’re doing. Yoast SEO handles mostrobots.txtdirectives through its settings.
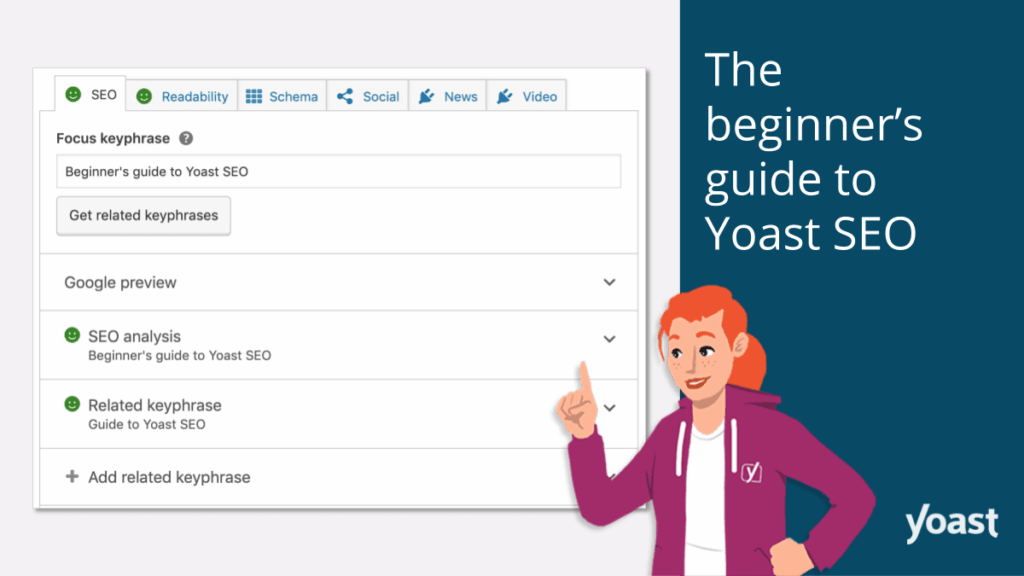
Step 6: Optimizing Individual Posts and Pages with the Yoast SEO Meta Box
This is where the magic happens on a day-to-day basis. When you’re editing any post or page, scroll down below the main content editor, and you’ll find the Yoast SEO meta box. This is your command center for on-page SEO.
-
Focus Keyphrase:
- Enter the primary keyword or keyphrase you want this specific page/post to rank for. Yoast SEO will then analyze your content against this keyphrase.
- E-E-A-T Tip: Choose a keyphrase that accurately reflects the content and what your target audience would search for.
-
SEO Analysis:
- This section provides real-time feedback on how well your content is optimized for your focus keyphrase. It uses a traffic light system:
- Green: Good!
- Orange: Room for improvement.
- Red: Needs urgent attention.
- Yoast will suggest improvements, such as including the keyphrase in your title, meta description, and first paragraph, improving keyword density, and increasing text length.
- This section provides real-time feedback on how well your content is optimized for your focus keyphrase. It uses a traffic light system:
-
Readability Analysis:
- Yoast also analyzes the readability of your content. Remember AskByteWise.com’s mission: “Making Complex Tech Simple.” This feature helps you ensure your content is easy to understand for your audience, which is a significant factor for user engagement and indirectly, SEO.
- It checks for things like Flesch Reading Ease score, sentence length, use of transition words, and paragraph length.
-
Google Preview:
- This is an incredibly helpful feature! It shows you exactly how your page will appear in Google search results.
- SEO Title: Click to edit this. It’s often best to craft a compelling title that includes your focus keyphrase and is under 60 characters to avoid truncation. Use the dynamic variables (
%%title%%,%%sep%%,%%sitename%%) as a base, then customize. - Slug: This is the URL-friendly name for your post/page. Keep it short, descriptive, and include your focus keyphrase. (e.g.,
/yoast-seo-setup-guide/). - Meta Description: Click to edit. Write a concise, compelling summary of your page’s content, including your focus keyphrase. Aim for around 150-160 characters. This acts like an advertisement for your page in search results.
-
Schema Tab:
- This allows you to specify the type of content (e.g., Article, Blog Post, Product) and page type (e.g., Web Page, ItemPage). This helps search engines understand the context of your content, leading to richer search results.
- E-E-A-T Tip: Correctly defining your schema type provides search engines with structured data, enhancing your authority.
-
Social Tab:
- This lets you control how your post/page appears when shared on social media platforms like Facebook and Twitter. You can set a specific image, title, and description for social shares, overriding the default. This is great for visual appeal and consistent branding.
Troubleshooting Common Yoast SEO Issues
Even with the best setup, you might encounter a few hiccups. Here are some common issues and their solutions:
- My Meta Description Isn’t Showing in Google!
- Cause: Google often rewrites meta descriptions if it thinks it can provide a more relevant snippet from your page content. This is normal and out of Yoast’s direct control.
- Solution: Ensure your on-page content is rich and relevant. Write a meta description that accurately summarizes the page and includes your target keywords, but also focus on creating high-quality, comprehensive content.
- My XML Sitemap is Not Working / Showing Errors!
- Cause: Plugin conflicts, server configuration issues, or incorrect file permissions.
- Solution:
- Check for plugin conflicts by temporarily deactivating other plugins one by one.
- Clear your caching plugin’s cache.
- Contact your hosting provider to check for server-side issues or file permissions if the problem persists.
- Go to Yoast SEO > General > Features and toggle the “XML Sitemaps” feature off and on again.
- Yoast SEO Analysis Stays Red/Orange, Even After I Make Changes!
- Cause: You might not be addressing all the suggestions, or the suggestions might not perfectly align with your content strategy. Sometimes, prioritizing natural language over hitting every single Yoast suggestion is better.
- Solution:
- Thoroughly review all the suggestions in the SEO and Readability analyses.
- Ensure your focus keyphrase is naturally integrated into your title, first paragraph, headings, and throughout the content.
- Check for keyword density – don’t stuff keywords, but make sure they appear naturally.
- Sometimes, if your content is truly comprehensive, you might not hit every “green light” for a very specific keyphrase, and that’s okay. Focus on user value first.
- My Site Isn’t Being Indexed by Google!
- Cause: You might have accidentally set your site to “noindex” in WordPress settings or Yoast SEO.
- Solution:
- Go to Settings > Reading in WordPress and ensure “Discourage search engines from indexing this site” is unchecked.
- Go to Yoast SEO > Search Appearance > Content Types and ensure “Show [Content Type] in search results?” is set to Yes for all relevant content types.
- Check your
robots.txtfile (via Yoast Tools or FTP) to ensure noDisallow: /rule is present. - Check Google Search Console for any manual actions or crawling errors.
Conclusion: Your SEO Journey Has Just Begun!
You’ve just walked through the definitive guide to setting up Yoast SEO for Beginners: How to Set It Up Correctly. By following these steps, you’ve laid a strong, SEO-optimized foundation for your WordPress website. This isn’t just about technical setup; it’s about communicating effectively with search engines so they can understand and present your valuable content to the right audience.
Remember, SEO is an ongoing process. Yoast SEO is a powerful tool, but it’s just that – a tool. Your ultimate success will come from consistently creating high-quality, helpful, and engaging content that truly serves your audience.
Next Steps:
- Regularly Optimize Content: Use the Yoast SEO meta box on every new post and page you create.
- Monitor Your Progress: Connect your site to Google Search Console and Google Analytics to track your search performance and user behavior.
- Learn More: Continue to read AskByteWise.com’s tutorials on content marketing, keyword research, and advanced SEO strategies.
- Stay Updated: Keep Yoast SEO and all your other plugins and your WordPress core updated to ensure compatibility and security.
Now go forth and conquer those search rankings!
Frequently Asked Questions (FAQ)
Q1: Is Yoast SEO completely free? What are the benefits of Yoast SEO Premium?
A1: The core Yoast SEO plugin is robust and completely free, offering all the essential features covered in this guide. Yoast SEO Premium offers additional features like keyword optimization for synonyms and related keyphrases, internal linking suggestions, redirect manager, 24/7 support, and the ability to optimize for multiple focus keywords per page. For most beginners, the free version is more than sufficient.
Q2: Does using Yoast SEO guarantee my site will rank on the first page of Google?
A2: No, Yoast SEO is a tool that helps you optimize your site, but it doesn’t guarantee rankings. Achieving top rankings depends on many factors, including the quality of your content, keyword competition, your backlink profile, site speed, user experience, and overall authority (E-E-A-T). Yoast SEO ensures your site is technically sound and provides guidance for on-page optimization, which is a crucial part of the puzzle.
Q3: Should I remove other SEO plugins after installing Yoast SEO?
A3: Absolutely, yes! You should never run more than one full SEO plugin (like Yoast SEO, Rank Math, All in One SEO Pack) simultaneously on your WordPress site. Doing so will inevitably lead to conflicts, duplicate meta tags, sitemap errors, and generally break your SEO efforts. If you’re switching to Yoast SEO, deactivate and delete any other comprehensive SEO plugins first. Yoast has an import tool to help migrate settings.
Q4: My Yoast SEO score isn’t green. Should I be worried?
A4: While a green light is ideal, don’t obsess over it. The Yoast SEO score is a guide, not a strict rule. Sometimes, aiming for perfect readability or every SEO suggestion can make your content sound unnatural. Focus on creating high-quality, comprehensive, and helpful content for your users first. If your content is genuinely good and covers the topic thoroughly, search engines will often reward it, even if Yoast gives you an orange light. Use the suggestions as a checklist, but prioritize user experience and natural language above all.
See more: Yoast SEO for Beginners: How to Set It Up Correctly.
Discover: AskByteWise.