Ever found yourself in a tricky situation where you’re collaborating on a Google Sheet, but you’re constantly worried about accidental deletions, unauthorized edits, or sensitive data falling into the wrong hands? You’re not alone. In today’s collaborative world, sharing spreadsheets is essential, but doing it securely and effectively is a whole different ball game. Mastering How to Share and Manage Permissions in Google Sheets isn’t just a technical skill; it’s a fundamental aspect of maintaining data integrity, boosting productivity, and ensuring peace of mind for you and your team. This definitive guide will transform you from a cautious sharer into a confident collaborator, ensuring your data stays safe while teamwork flourishes.
Why Master Google Sheets Sharing & Permissions?
As Noah Evans, I’ve seen countless teams struggle with inefficient workflows simply because they haven’t unlocked the full power of Google Sheets’ sharing and permission controls. It’s more than just a “share” button; it’s a sophisticated system designed to empower collaboration while safeguarding your valuable data.
Here’s why becoming a pro at managing permissions is non-negotiable:
- Enhanced Collaboration: Allow multiple users to work on the same document simultaneously, speeding up projects and reducing version control headaches.
- Data Integrity & Accuracy: Prevent accidental (or intentional) modifications to critical formulas, essential data sets, or reporting structures. Imagine a crucial pivot table being altered just before a big presentation – permissions prevent that.
- Security & Confidentiality: Protect sensitive information, such as financial forecasts, HR records, or customer contact details, ensuring only authorized individuals can view or edit them.
- Streamlined Workflows: Clearly define roles and responsibilities, ensuring everyone knows what they can and cannot do within the spreadsheet, leading to fewer errors and more focused work.
- Compliance: For businesses, proper permission management can be vital for adhering to data protection regulations.
Without a solid understanding of these features, your team could be navigating a minefield of potential data mishaps. Let’s make sure that’s not you.
The Basics: Sharing Your Entire Google Sheet
Sharing your Google Sheet is the first step, and understanding the options here is crucial. This primary sharing mechanism controls who can access the entire file and what general level of interaction they have.
Step-by-Step: Sharing Your Google Sheet with Specific People
This method is ideal when you know exactly who needs access to your sheet.
- Open Your Google Sheet: Navigate to the Google Sheet you wish to share.
- Click the “Share” Button: In the top-right corner of your Google Sheets interface, you’ll find a prominent green button labeled Share. Click it.
- Add Specific People or Groups:
- In the “Share with people and groups” dialog box, enter the email addresses of the individuals or Google Groups you want to invite. You can add multiple addresses.
- To the right of the email input field, you’ll see a dropdown menu. This is where you set their access level:
- Viewer: They can see the content but cannot make any changes. Perfect for sharing reports or final data sets.
- Commenter: They can view the content and add comments. This is great for feedback cycles without risking data alteration.
- Editor: They have full permission to view, edit, add, or delete content, including formulas, rows, columns, and even other sheets within the workbook. They can also share the file with others unless you explicitly restrict this.
- Optional – Notify People: By default, Google Sheets will send an email notification to the people you’ve added. You can include a custom message. If you uncheck “Notify people,” they won’t receive an email but will see the sheet listed in their “Shared with me” section in Google Drive.
- Optional – Prevent Editors from Changing Access and Adding New People: Below the notification checkbox, you’ll see a small gear icon (⚙️) labeled Settings. Clicking this reveals two important options:
- Editors can change permissions and share: Uncheck this if you want to prevent editors from inviting new people or changing existing access levels.
- Viewers and commenters can see the option to download, print, and copy: Uncheck this if you want to restrict these actions for viewers and commenters, especially for sensitive data.
- Click “Send” or “Share”: After configuring all options, click the Send button (if notifying) or Share (if not notifying) to finalize the sharing process.
Understanding Access Roles for the Entire Sheet
Each role grants a distinct level of interaction with your spreadsheet:
- Viewer: Think of them as reading a book. They can read every word, but they can’t write in the margins or tear out pages. This role is perfect for sharing completed reports, data dashboards, or information that needs to be consumed but not altered. They cannot change any cell content, add or delete rows or columns, or modify any formula definitions.
- Commenter: These are your proofreaders or feedback providers. They can read the content, and they can add sticky notes (comments) on specific cells or ranges, but they cannot directly modify the underlying data. This is invaluable during the review phase of a project, allowing for granular feedback without the risk of data corruption.
- Editor: This role grants the most power. Editors can do almost anything you can do as the owner, short of deleting the file from your Drive (unless they also gain ownership). They can modify any cell, add complex formulas, create pivot tables, filter data, add new sheets, and even delete content. Grant this role only to trusted collaborators who genuinely need full control over the spreadsheet’s content and structure.
Managing Existing Permissions
Your team changes, projects evolve, and so should your sharing settings. It’s easy to adjust permissions for anyone you’ve already shared the sheet with.
- Re-open the “Share” Dialog: Click the Share button again.
- Locate the User: In the “Share with people and groups” section, you’ll see a list of everyone with access.
- Change Roles: Click the dropdown menu next to their name and select a different role (Viewer, Commenter, or Editor).
- Remove Access: To completely remove someone’s access, click the dropdown next to their name and select Remove access.
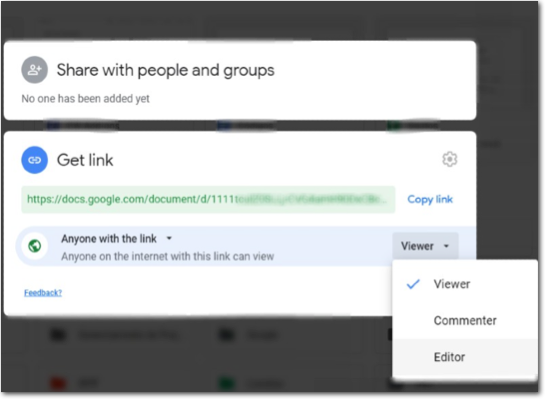
- Change General Access (Link Sharing): Below the “Share with people and groups” section, you’ll find “General access.”
- Restricted: Only people explicitly added in the “Share with people and groups” section can open this link. This is the most secure default.
- Anyone with the link: Anyone who has the link (whether they were sent it or stumbled upon it) can open the sheet. You can then define their general role: Viewer, Commenter, or Editor. Use this with caution, especially for sensitive data. It’s often used for public-facing data or large groups where individual invites are impractical.
- Click “Done”: After making your adjustments, click Done.
Important Note: When using “Anyone with the link,” remember that while you set a general access role (e.g., Viewer), anyone specifically invited in the “Share with people and groups” section will still retain their individual permissions, which can be higher than the general access setting.
Advanced Permissions: Protecting Specific Ranges & Sheets
While sharing the entire Google Sheet is fundamental, sometimes you need more granular control. What if you want to allow everyone to edit most of the sheet, but protect a specific cell containing a crucial formula, a row of header information, or an entire sheet of summary data? This is where “Protected sheets and ranges” comes in.
Protecting a Range or a Full Sheet Step-by-Step
This feature allows you to define specific areas of your sheet that only certain people can edit, even if they are general “Editors” for the entire file.
- Select the Cells/Range or Sheet:
- To protect a range: Highlight the cells (e.g., A1:C10), an entire row (click the row number), or an entire column (click the column letter) you wish to protect.
- To protect an entire sheet: Click the sheet tab at the bottom of the screen.
- Open “Protected sheets and ranges”: Go to Data > Protected sheets and ranges from the top menu bar. A sidebar will open on the right.
- Add a New Protection Rule: Click the Add a sheet or range button in the sidebar.
- Define the Protection:
- Range: If you selected a range, it will pre-populate. You can adjust it here.
- Sheet: If you want to protect an entire sheet, switch to the “Sheet” tab within the dialog and select the desired sheet from the dropdown. You can also choose to “Except certain cells” within a protected sheet, allowing specific areas to remain editable.
- Set Permissions:
- Description (Optional): Add a descriptive name for your protection (e.g., “Monthly Sales Formulas,” “HR Data Entry”). This helps you manage multiple protections.
- Permissions: Click Set permissions. Here’s where you define who can edit this specific range or sheet.
- Show a warning when editing this range: This is a soft protection. Anyone (including Editors) will see a warning message before they can edit the range, but they can choose to proceed. Useful as a gentle reminder not to mess with specific areas.
- Restrict who can edit this range: This is the robust protection. You’ll then choose:
- Only you: Only the sheet owner (or the person who created this protection) can edit.
- Custom: Specify individual email addresses or Google Groups that are allowed to edit this protected range. All other Editors of the sheet will be blocked.
- Domain (if applicable for Workspace users): Restrict editing to users within your organization’s domain.
- Click “Done”: Once your permissions are set, click Done.

Tip: Use range protection to secure your core calculations. For instance, if you have a financial report where cell C15 contains a complex sum formula like
=SUMIF(A:A, "Revenue", B:B) - SUMIF(A:A, "Expenses", B:B)to calculate net profit, you absolutely want to protect that cell from accidental alteration. You might allow others to input data into columns A and B, but that crucial net profit formula in C15 needs to stay untouched.
Understanding “Show a warning when editing” vs. “Restrict who can edit”
Choosing the right type of protection is key to balancing collaboration and data integrity:
- “Show a warning when editing this range” (Soft Protection):
- When to use: For sections where changes are generally discouraged but might occasionally be necessary, and you trust your collaborators to heed the warning. It’s a “tread carefully” sign rather than a “no entry” barrier. Good for fields that are derived from other data but could theoretically be overridden.
- How it works: When an editor tries to change a cell in a protected range, a pop-up warning appears. They can choose to “OK” and edit anyway.
- “Restrict who can edit this range” (Hard Protection):
- When to use: For absolutely critical data, header rows, crucial formulas, or any cell where unauthorized changes would have significant consequences. This is your “no entry” sign.
- How it works: Only the designated individuals (or “Only you”) can edit the specified range. Any other editor will receive an error message and be completely unable to modify the content within that range.
Editing or Removing Protections
As projects evolve, you might need to adjust or remove existing protections.
- Open the “Protected sheets and ranges” Sidebar: Go to Data > Protected sheets and ranges.
- Select the Protection Rule: In the sidebar, you’ll see a list of all your active protections. Click on the one you wish to modify or remove.
- Edit or Delete:
- To edit the range or its permissions, make your changes directly in the sidebar and click Done.
- To delete the protection entirely, click the trash can icon (🗑️) next to the rule name. Confirm your action.
Best Practices for Sharing and Permissions
Beyond the technical steps, adopting a strategic approach to sharing and permissions will save you headaches in the long run.
- Start with the Principle of Least Privilege: Always grant the minimum necessary access. If someone only needs to see the data, give them Viewer access. If they need to provide feedback, make them a Commenter. Only grant Editor access if they truly need to modify the sheet’s content or structure. You can always increase permissions later.
- Default to “Restricted” General Access: When first sharing a sheet, keep the “General access” set to Restricted. This ensures only the people you explicitly invite can access the sheet. Only change to “Anyone with the link” if absolutely necessary and you understand the implications.
- Regularly Review Permissions: Periodically check who has access to your important sheets. People leave teams, roles change, and projects end. Remove access for those who no longer need it. This is a critical security measure.
- Utilize Google Groups for Teams: If you’re working with a large team or multiple projects, create Google Groups (e.g., “Sales Team Editors,” “Project X Viewers”). Instead of adding individual email addresses, share with the group. When team members join or leave, you just update the group membership, and their access to all shared sheets updates automatically. This is a massive time-saver.
- Understand the Difference Between File Sharing and Content Protection: Remember, sharing a file with someone as an “Editor” gives them the ability to change anything in that file. Protecting a range within that file then overrides the general “Editor” permission for that specific area. These two features work together to provide comprehensive control.
- Communicate Clearly with Collaborators: Let your team know about the permission structure. Explain why certain areas are protected. This transparency fosters trust and reduces frustration. For instance, clearly state: “Please enter your sales figures in Column C, but note that Column D (which calculates commission using a
=PRODUCTformula) is protected to ensure accuracy.”
Common Sharing & Permission Issues and How to Fix Them
Even with the best intentions, you might run into snags. Here are some frequent problems and their straightforward solutions.
- “I can’t edit this sheet, but I should be an Editor!”
- Cause: You might have Viewer or Commenter access, or the specific cell or range you’re trying to edit is protected.
- Fix: Contact the sheet owner or a co-editor and ask them to verify your general access role. If you are an Editor, ask them to check Data > Protected sheets and ranges to see if the area you’re trying to edit is under a restriction.
- “My changes aren’t saving, or I keep getting an error when I try to type!”
- Cause: Similar to the above, you likely don’t have editing permissions for that specific cell or the entire sheet. Another possibility is a temporary internet connection issue.
- Fix: First, check your internet connection. If that’s fine, verify your access role and any range protections with the sheet owner.
- “Someone keeps messing up my complex formulas/data in a specific column!”
- Cause: You’ve granted general Editor access, and they are either unaware or accidentally making changes to critical areas.
- Fix: Implement range protection for those specific cells, columns, or rows. Go to Data > Protected sheets and ranges, select the area, and choose “Restrict who can edit this range,” allowing only yourself or specific trusted individuals. For example, if Column E contains
IFERROR(VLOOKUP(A2, 'Lookup Table'!A:B, 2, FALSE), "N/A")to pull data, protect that entire column.
- “I accidentally shared a sensitive sheet with the wrong person via a public link!”
- Cause: You set “Anyone with the link” access and either shared the link inadvertently or it became public.
- Fix: Immediately go to the Share dialog, change the “General access” from “Anyone with the link” to Restricted. Then, manually add the correct individuals in the “Share with people and groups” section.
- “I need someone to temporarily view the sheet, but their access should expire.”
- Cause: Google Sheets doesn’t have a direct “expiration date” feature built into the initial sharing dialog for all users, but it does for Workspace users.
- Fix: If you’re a Google Workspace user, when you add a specific person in the Share dialog, you can click the dropdown next to their role and choose “Add expiration.” If not a Workspace user, you’ll need to manually remove their access after the agreed-upon period.
Beyond the Basics: Advanced Tips
Once you’re comfortable with the core sharing and permission settings, here are a few advanced moves to truly master your Google Sheets workflow.
- Transferring Ownership: Sometimes, a project lead changes, or you create a sheet for someone else. You can transfer ownership of a Google Sheet.
- Open the Share dialog.
- Find the person you want to make the new owner. They must already have Editor access.
- Click the dropdown next to their name and select Transfer ownership.
- They will receive an email and must accept the transfer. Until they accept, you remain the owner.
- Important: Once ownership is transferred, you’ll become an Editor, and the new owner will have full control, including the ability to delete the file.
- Publishing a Sheet to the Web (for Public Viewing without Direct Access):
If you want to make a sheet’s content publicly viewable on a website or blog without granting direct sharing permissions (which might reveal sensitive background info or allow commenting), you can publish it.- Go to File > Share > Publish to web.
- Choose what you want to publish (entire document or a specific sheet) and the format (web page, CSV, PDF, etc.).
- Click Publish.
- Note: This creates a public URL. The content is static (or updates on a set schedule) and cannot be interacted with directly as a Google Sheet. It’s a one-way broadcast of information.
- Setting an Expiration Date for Access (Google Workspace Feature):
For temporary collaborators (e.g., contractors, short-term project members), Google Workspace users can set an expiration date for their access.- In the Share dialog, add the person’s email address.
- Before sending, click the dropdown menu next to their role (e.g., “Editor”).
- Select Add expiration.
- Choose a date for their access to automatically expire. This is an excellent way to maintain security and ensure access is only granted for the necessary duration.
Conclusion: Your Spreadsheet, Your Rules
Congratulations! You’ve navigated the intricacies of How to Share and Manage Permissions in Google Sheets, from basic file-level sharing to granular range protection. By understanding and applying these tools, you’re not just preventing errors; you’re building a foundation for truly collaborative, secure, and efficient teamwork.
Remember, every shared sheet is an opportunity to empower your team while safeguarding your data. Embrace the principle of least privilege, review your settings regularly, and communicate clearly. With these skills in your arsenal, you’re not just a spreadsheet user; you’re a data strategist, ensuring your information flows freely to those who need it, and remains secure from those who don’t. Go forth and collaborate with confidence!
Frequently Asked Questions (FAQ)
1. What’s the difference between sharing a whole sheet and protecting a range?
Sharing a whole sheet (via the Share button) controls who can access the entire file and their general role (Viewer, Commenter, Editor). Protecting a range (via Data > Protected sheets and ranges) controls who can edit specific cells, rows, columns, or an entire sheet within that file, even if they have overall Editor access to the document. It’s a layer of granular control inside the shared document.
2. Can I prevent someone from copying or downloading my Google Sheet?
Yes, to a degree. In the Share dialog, click the gear icon (⚙️) in the top right. You’ll see an option “Viewers and commenters can see the option to download, print, and copy”. Unchecking this will hide these options for Viewers and Commenters. However, for users with Editor access, there’s no reliable way to prevent them from copying, downloading, or screenshotting the data, as they have full control over the content.
3. What happens if I change a user’s role from Editor to Viewer?
When you change a user’s role from Editor to Viewer, they will immediately lose the ability to make any changes to the sheet. Any edits they were in the middle of (but hadn’t saved/committed) would likely be lost, and they will no longer be able to type into cells, add/delete rows or columns, or modify formulas. They will only be able to view the content.
4. Can I share a Google Sheet with someone who doesn’t have a Google account?
Yes, but with limitations. You can set the “General access” to “Anyone with the link” and choose their role (e.g., Viewer or Commenter). Anyone with that link can then access the sheet without needing to sign in with a Google account. However, you cannot directly invite specific non-Google email addresses into the “Share with people and groups” section with this method; they would need a Google account for direct invitation and assigned permissions.
5. How do I transfer ownership of a Google Sheet to someone else?
To transfer ownership, the recipient must first have Editor access to the sheet. Then, open the Share dialog, find the recipient’s name, click the dropdown menu next to their role, and select “Transfer ownership.” They will receive an email invitation to accept ownership. Once accepted, you will become an Editor, and they will become the new owner with full control.
See more: How to Share and Manage Permissions in Google Sheets.
Discover: AskByteWise.