In today’s fast-paced digital world, managing confidential information is a constant challenge. Whether you’re a student juggling project deadlines, a professional handling sensitive client data, or simply organizing your personal finances, the fear of accidental changes or unauthorized eyes peeking at your spreadsheets is real. It’s like leaving your valuable notes scattered on a busy desk – vulnerable to anyone passing by. But what if you could put those notes in a secure, locked drawer? That’s precisely what we’ll do today. This comprehensive guide from AskByteWise.com will show you how to protect an Excel sheet with a password, transforming your data from vulnerable to virtually impenetrable. Get ready to boost your data security and streamline your workflow with confidence!
Why Safeguarding Your Data in Excel Is Non-Negotiable
Think about the sheer amount of critical information that lives within your Excel spreadsheets. Financial forecasts, client lists, project timelines, student grades, personal budgets, health trackers – the list goes on. Each of these files represents hours of work and often contains highly sensitive details.
The risk management associated with unprotected data is significant:
- Accidental Alterations: A simple misclick by a colleague or even yourself can inadvertently delete crucial formulas, corrupt data, or introduce errors, derailing your
focusand demanding precioustime managementto fix. - Unauthorized Viewing: Imagine your financial projections or employee salary data falling into the wrong hands. This isn’t just a privacy breach; it can have severe financial, legal, and reputational consequences.
- Intellectual Property Theft: Proprietary algorithms, product roadmaps, or research data stored in unprotected sheets are easy targets for competitors.
- Compliance Issues: Many industries have strict regulations (like GDPR, HIPAA) regarding
data privacyand protection. Failing to secure sensitive data can lead to hefty fines and legal battles, significantly impacting yourgoal settingfor business growth.
By learning how to protect an Excel sheet with a password, you’re not just adding a barrier; you’re implementing a proactive document protection strategy. You’re ensuring data integrity, fostering trustworthiness in your shared files, and gaining immense peace of mind. It’s a fundamental step toward better information security and overall digital well-being.
Demystifying Excel’s Protection Power: Workbook vs. Worksheet
Before we dive into the “how-to,” it’s crucial to understand the different layers of protection Excel offers. Think of your Excel file as a house. You can protect the entire house (the workbook), individual rooms within it (the worksheets), or even specific items within those rooms (individual cells). Each level serves a distinct purpose and is vital for tailored access control.
Protecting the Worksheet (Your Everyday Shield)
This is the most common and versatile form of protection. When you protect an Excel sheet with a password, you’re primarily safeguarding a specific worksheet.
- What it protects:
- Cell Contents: Prevents users from typing into, deleting, or modifying data in specific cells.
- Formatting: Stops changes to cell formatting, row/column sizes, and conditional formatting rules.
- Objects: Secures embedded charts, shapes, and pictures from being moved, resized, or deleted.
- Scenarios: Protects defined scenarios from modification.
- What it doesn’t protect:
- It doesn’t prevent someone from opening the file.
- It doesn’t stop someone from adding, deleting, or renaming worksheets within the same workbook.
- Best for:
Collaborative workwhere you want multiple users to view data but only allow specific entries or prevent accidental changes to critical calculations. Ideal for forms, templates, or dashboards.
Protecting the Workbook Structure (The Blueprint Defender)
This method focuses on the architectural integrity of your entire Excel file.
- What it protects:
- Structure: Prevents users from inserting, deleting, renaming, moving, copying, or hiding/unhiding worksheets. It essentially locks down the layout of your workbook.
- Windows: Keeps the workbook window size and position consistent (less common in modern Excel versions but historically relevant).
- What it doesn’t protect:
- It doesn’t protect the contents of individual cells within the worksheets. Someone can still type freely into an unprotected cell on an unprotected sheet.
- Best for: Maintaining the consistency of multi-sheet workbooks, ensuring that the intended
workflowforshared filesremains intact, and preventing users from accidentally breaking links between sheets.
Understanding these distinctions is the first step in effective document protection. Choose the right tool for the job to ensure your data is secure without unnecessarily hindering legitimate users.
Your Essential Guide: How to Protect an Excel Sheet with a Password (Step-by-Step)
Now, let’s get hands-on. Here’s how to apply Excel’s powerful protection features. We’ll cover the most common scenarios, ensuring you can secure your data effectively, right now.
Method 1: Protecting a Worksheet (The Everyday Shield)
This is probably the most frequently used protection method. It’s perfect for preventing accidental changes to formulas, critical data, or the structure of a specific sheet, making your collaboration safer and your focus sharper.
- Open Your Excel File: Launch the spreadsheet you wish to protect.
- Navigate to the Target Worksheet: Click on the tab of the specific sheet you want to secure.
- Go to the “Review” Tab: In the Excel ribbon, click on the Review tab.
- Click “Protect Sheet”: In the “Protect” group, you’ll see the Protect Sheet button. Click it.
- Self-correction tip: If you only want to lock certain cells, you must first format those cells as “Locked” before protecting the sheet. We’ll cover this in a later section on advanced tips. For now, assume you want to protect the entire sheet.
- Set Your Password and Permissions: A dialog box will appear.
- “Password to unprotect sheet”: Enter a strong, memorable password here. Remember it! There’s no recovery for forgotten Excel passwords.
- “Allow users of this worksheet to:”: Below the password field, you’ll see a list of actions. By default, “Select locked cells” and “Select unlocked cells” are checked. Deselect any actions you want to prevent users from performing. For instance, if you don’t want anyone to sort data, uncheck “Sort.” If you want to prevent any input at all, ensure only “Select locked cells” and “Select unlocked cells” are checked, and then format all cells as locked.
- Confirm Your Password: Click OK. Excel will prompt you to re-enter your password to confirm. Type it again and click OK.
Congratulations! Your worksheet is now protected. Try typing into a cell, and you’ll see a warning message.
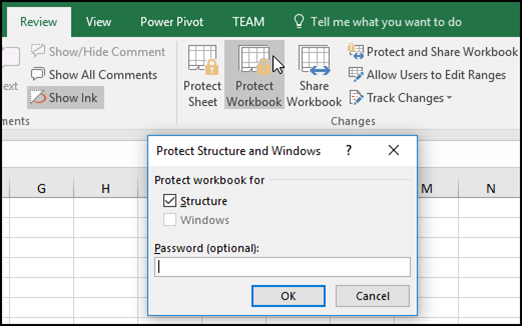
Method 2: Protecting Your Entire Workbook Structure (The Blueprint Defender)
This method ensures the overall layout of your Excel file remains intact, preventing unwanted alterations to your workbook’s workflow and organization.
- Open Your Excel File: Access the workbook you want to protect.
- Go to the “Review” Tab: Click on the Review tab in the ribbon.
- Click “Protect Workbook”: In the “Protect” group (next to “Protect Sheet”), click the Protect Workbook button.
- Choose “Structure” and Set Password: A small dialog box will appear.
- Ensure Structure is checked. (The “Windows” option is less relevant in modern Excel versions).
- “Password (optional)”: Enter a strong, memorable password. While it says optional, using a password is the point of
document protection!
- Confirm Your Password: Click OK, re-enter your password when prompted, and click OK again.
Now, try right-clicking on a worksheet tab. You’ll notice options like “Insert,” “Delete,” “Rename,” and “Move or Copy” are grayed out. Your workbook structure is secured!
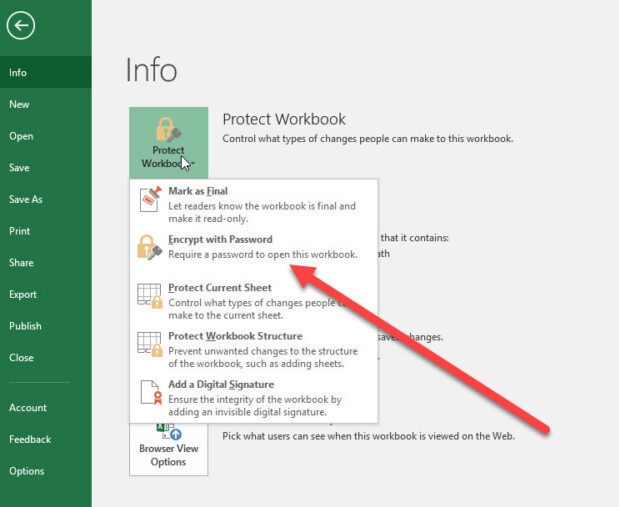
Method 3: Encrypting Your File with a Password to Open (The Ultimate Gatekeeper)
This is the highest level of data security for an Excel file. It prevents anyone from even opening the file without the correct password. This is essential for truly confidential information.
- Open Your Excel File: The file you want to encrypt.
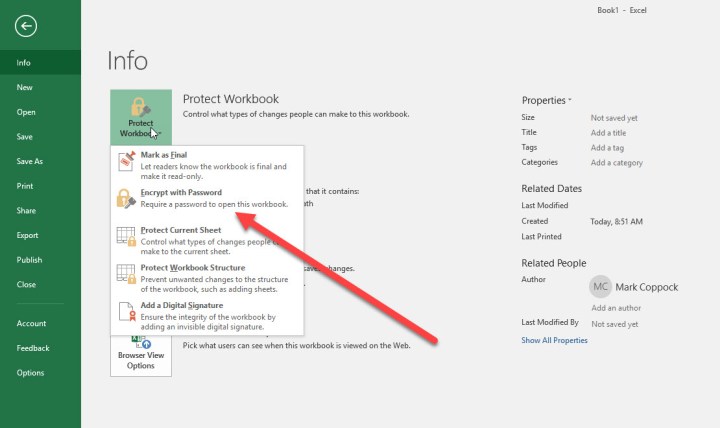
- Go to the “File” Tab: Click on the File tab (usually in the top-left corner of Excel).
- Select “Info”: In the left-hand menu, choose Info.
- Click “Protect Workbook”: On the “Info” screen, you’ll see a “Protect Workbook” button with a shield icon. Click it.
- Choose “Encrypt with Password”: From the dropdown menu, select Encrypt with Password.
- Enter Your Password: A dialog box will appear asking for a password. Enter a very strong, unique, and memorable password. Seriously, if you forget this password, there is absolutely no way to recover your file or its contents. This is irreversible
encryption. - Confirm Your Password: Click OK, re-enter your password when prompted, and click OK again.
- Save Your File: Crucially, save your file for the encryption to take effect. If you don’t save, the password won’t be applied.
Now, when you try to open this Excel file, you’ll be prompted to enter the password before you can see any of its contents. This is powerful privacy in action!
Mastering Security: Advanced Tips & Best Practices
Understanding how to protect an Excel sheet with a password is just the beginning. To truly demonstrate E-E-A-T and maintain robust data security, let’s delve into some advanced tips and best practices.
Understanding Strong Passwords: Your First Line of Defense
A password is only as good as its password strength. A weak password makes your document protection virtually useless.
- Go Long: Aim for at least 12-16 characters. The longer the password, the harder it is to crack.
- Mix It Up: Use a combination of uppercase letters, lowercase letters, numbers, and symbols.
- Avoid the Obvious: Steer clear of personal information (birthdays, names), common words, or easily guessable sequences (e.g., “123456”).
- Use Passphrases: Instead of a single word, create a memorable phrase like “MyCatsLoveFishTacos!2024”. This is long, complex, but easy for you to remember.
- Never Reuse: Use unique passwords for highly sensitive Excel files, just as you would for your email or banking.
- Consider a Password Manager: For managing multiple strong passwords, a reputable password manager can be a game-changer for your
time managementandinformation security.
Unprotecting and Modifying Passwords
Life changes, and so might your access control needs.
- Unprotecting a Worksheet: Go to the Review tab and click Unprotect Sheet. Enter your password when prompted.
- Unprotecting a Workbook Structure: Go to the Review tab and click Unprotect Workbook. Enter your password.
- Removing File Encryption: Go to File > Info > Protect Workbook > Encrypt with Password. Delete the stars in the password field, leave it blank, and click OK. Remember to save the file afterward.
- Changing Passwords: The easiest way to change a password is to unprotect the element (sheet, workbook, or file), then re-protect it with a new password.
Crucial Risk Management Tip: If you forget a password to unprotect a sheet or workbook structure, it might be possible to find third-party tools that can help, but they are not guaranteed. Forgetting an “Encrypt with Password” password means your file is permanently lost. Write down critical passwords and store them securely, ideally in an encrypted password manager.
Selective Protection: Locking Specific Cells for Collaborative Work
This is where Excel’s protection truly shines for collaboration and workflow management. You can protect a worksheet but allow users to edit only specific cells. This is perfect for data entry forms or templates where formulas need to be protected but inputs are necessary.
- Select the Cells You Want to Keep UNLOCKED: Before protecting the sheet, highlight the cells that users should be able to edit.
- Format Cells: Right-click on the selected cells and choose Format Cells… (or press Ctrl+1).
- Go to the “Protection” Tab: In the “Format Cells” dialog box, navigate to the Protection tab.
- Deselect “Locked”: Uncheck the Locked box. Click OK. All other cells in the sheet will remain “Locked” by default.
- Protect the Worksheet: Now, follow the steps in Method 1: Protecting a Worksheet. When you protect the sheet, only the cells you unlocked in step 4 will be editable. All other cells will be protected.
This powerful feature allows for incredibly granular access control, facilitating teamwork without compromising data integrity.
Read-Only Recommendation vs. Password Protection
Excel also offers a “Read-Only Recommended” option (found under File > Save As > Tools > General Options).
- Read-Only Recommendation: This is a suggestion, not an enforcement. When someone opens the file, they’ll see a prompt asking if they want to open it as read-only. They can easily choose “No” and edit the file. It’s helpful for simple
version controlcues but offers no realdata security. - Password Protection (Encrypt with Password): This enforces a read-only state (if no editing password is provided) or prevents opening altogether. It’s the real deal for
confidential information.
Never confuse a read-only recommendation with actual document protection.
Weaving Security into Your Daily Workflow and Time Management
Learning how to protect an Excel sheet with a password is a skill; applying it consistently is a habit. Integrating these security measures into your daily routine will not only safeguard your data but also enhance your overall productivity and focus.
- Make it a Habit, Not an Afterthought: Whenever you create or receive a new spreadsheet containing sensitive data, make
data securitythe first consideration. Before you even start populating it, think: Does this need protection? What level? This proactive approach savestime managementlater on. - Educate Your Team: If you’re working in a
collaborative workenvironment, ensure everyone understands the importance of password protection, especially forshared files. Conduct quick training sessions to demonstratehow to protect an Excel sheet with a passwordand discuss best practices forpassword strength. This fosters a culture ofinformation security. - Regularly Review Permissions: Periodically check the protection settings on your critical spreadsheets. Do the current
access controlsettings still meet your needs? Have team members orworkflowprocesses changed? An annual or quarterlyaudit trailsreview can prevent security lapses. - Implement a Naming Convention: For files that are protected with a password, consider adding a subtle indicator to the filename (e.g.,
ProjectBudget_Secured.xlsx). This simpletime managementtrick reminds you and your team of its protected status. - Backup Your Passwords (Securely!): While we emphasized not forgetting passwords, having a secure, encrypted backup (e.g., in a trusted password manager, or a physical note in a locked safe) for your most crucial files is smart
risk management. Never store them in plain text on your computer. - Think Beyond Excel: Remember that Excel protection is one layer. A comprehensive
data securitystrategy includes securing your computer, using strong network passwords, and understanding phishing risks.
By making these practices part of your goal setting for digital hygiene, you transform document protection from a daunting task into a seamless part of your efficient workflow. It’s about empowering yourself and your team to work securely and confidently, knowing your valuable data is shielded.
Conclusion
We’ve journeyed through the vital importance of data security in Excel, uncovered the distinct layers of protection available, and walked through precise, step-by-step instructions on how to protect an Excel sheet with a password. You now possess the knowledge to safeguard your confidential information, prevent accidental alterations, and maintain the privacy essential for both personal and professional workflow.
From protecting individual worksheets to encrypting entire workbooks, Excel provides robust tools for access control. Remember, the true strength of these features lies in your consistent application and the adoption of strong password strength practices. Don’t let your valuable data remain vulnerable; take control today. By integrating these security measures, you’re not just protecting your files; you’re investing in your peace of mind, enhancing your collaboration capabilities, and building a more secure and efficient digital future.
Frequently Asked Questions (FAQ)
Q1: What happens if I forget the password I used to protect an Excel sheet or workbook?
A1: Unfortunately, Excel does not offer a built-in password recovery feature for protection. If you forget a password to unprotect a worksheet or workbook structure, it might be possible to find third-party tools that claim to help, but their effectiveness is not guaranteed and often comes with risks. If you use “Encrypt with Password” (Method 3), and you forget that password, the file and all its contents are permanently inaccessible. This underscores the critical importance of choosing strong, memorable passwords and backing them up securely.
Q2: Can I protect only a single cell in an Excel sheet?
A2: Yes, you can! While you protect the entire worksheet (Method 1), you can specify which cells remain editable. By default, all cells are “locked” in Excel’s cell formatting properties. Before you apply worksheet protection, you need to select the specific cell(s) you want to remain unlocked (editable), right-click, choose “Format Cells,” go to the “Protection” tab, and uncheck “Locked.” Then, when you apply worksheet protection with a password, only those cells you explicitly “unlocked” will be editable, while all other cells will be protected.
Q3: What’s the main difference between “Protect Sheet” and “Protect Workbook”?
A3:
- “Protect Sheet” (Method 1) focuses on the contents and formatting within a specific worksheet. It prevents users from modifying data in cells, changing formatting, or altering objects on that particular sheet. It doesn’t stop someone from adding, deleting, or renaming other sheets in the workbook.
- “Protect Workbook” (Method 2) focuses on the structure of the entire workbook. It prevents users from inserting, deleting, moving, renaming, or hiding worksheets within the file. It does not protect the contents of individual cells within those sheets.
These two protection types serve different access control purposes and are often used together for comprehensive document protection.
Q4: Does protecting an Excel sheet with a password offer enterprise-grade security?
A4: While Excel’s password protection is robust for most individual and small-team needs, it’s generally considered “good” but not “enterprise-grade” in isolation. For highly sensitive confidential information in large organizations, comprehensive data security strategies involve multiple layers: network security, access management systems, data loss prevention (DLP) solutions, robust backup and recovery, and digital rights management (DRM) alongside document-level password protection. For individuals and smaller teams, however, learning how to protect an Excel sheet with a password is an excellent and often sufficient first line of defense.
Q5: Can I protect an Excel sheet but still allow users to sort or filter data?
A5: Yes! When you use the “Protect Sheet” dialog box (Method 1), you’ll see a list of actions under “Allow users of this worksheet to:”. Simply ensure that “Sort” and “Use AutoFilter” (or “Use PivotTable reports”) are checked in this list before you set your password. This allows users to analyze data without being able to accidentally modify the underlying cell contents or formulas, facilitating secure collaboration and workflow.
See more: How to Protect an Excel Sheet with a Password.
Discover: AskByteWise.