Welcome to AskByteWise.com, where we make complex tech simple! Today, we’re tackling a common yet often overlooked issue that can significantly impact your website’s performance: broken links. If you’ve ever clicked a link only to land on a “404 Not Found” page, you’ve experienced a broken link firsthand. As a website owner, these aren’t just minor annoyances; they’re red flags for both your visitors and search engines. In this comprehensive guide, I’m going to walk you through how to find and fix broken links on your website step-by-step, ensuring your site remains a smooth, reliable experience for everyone. We’ll cover everything from understanding what broken links are to using powerful tools and implementing effective fixes, boosting your SEO and user satisfaction.
What Are Broken Links and Why Do They Matter?
Before we dive into the “how-to,” let’s clarify what we’re dealing with. A broken link, also known as a dead link or a 404 error, occurs when a hyperlink points to a resource (page, image, file, etc.) that no longer exists at that URL. When a user or a search engine bot tries to access this link, they are met with an error message, most commonly a “404 Not Found” page.
Think of it like trying to find a book in a library, but when you go to the shelf number listed, the space is empty. Frustrating, right?
The Impact of Broken Links
Fixing broken links isn’t just about good housekeeping; it’s crucial for several reasons:
- User Experience (UX): Nothing sours a user’s experience faster than clicking a link and landing on a dead end. It creates frustration, makes your site seem unprofessional, and often leads users to leave your site entirely.
- Search Engine Optimization (SEO): Search engines like Google use “spiders” or “crawlers” to navigate your website by following links. Too many broken links can hinder their ability to crawl your site effectively, potentially lowering your rankings. Google sees broken links as a sign of a neglected or low-quality website. A high number of 404s can also waste your “crawl budget,” meaning search engine bots spend time on non-existent pages instead of indexing your valuable content.
- Website Authority: Regularly encountering broken links erodes trust and diminishes your website’s authority in the eyes of both users and search engines.
- Sales and Conversions: If a broken link prevents a potential customer from reaching a product page, contact form, or crucial information, you’re directly losing out on opportunities.
In essence, a clean, link-error-free website sends positive signals to everyone: your audience, and the algorithms.
Before You Begin: Essential Preparations
As Noah Evans, I always emphasize preparation. Before you start fiddling with your website’s links, take these critical steps.
- Backup Your Website: This is non-negotiable. Seriously. Any significant changes you make to your website, especially involving redirects or
.htaccessfile edits, carry a small risk. A full backup acts as your safety net.- WordPress users: Use a plugin like UpdraftPlus or Duplicator to create a complete backup (files and database).
- Other platforms/manual: Ensure you have copies of all your website files and a database dump.
- Ensure Admin Access: You’ll need full administrator access to your website’s dashboard (e.g., WordPress admin panel) and potentially your hosting control panel (cPanel, Plesk, etc.) to access file managers or database tools.
- Understand Basic Navigation: Be familiar with your website’s backend – where to find posts, pages, plugins, and theme editor.
Best Practice: Always perform these checks during off-peak hours if possible, especially on live production sites, to minimize any potential impact on your users.
Step 1: How to Find Broken Links on Your Website
Finding broken links is the first, and often the most time-consuming, part of the process. Luckily, there are several excellent tools to help.
Method 1: Using Google Search Console (Recommended for All)
Google Search Console (GSC) is a free tool provided by Google that helps you monitor your site’s performance in Google Search results. It’s invaluable for identifying broken links because it shows you exactly what Google’s crawlers are seeing.
- Access Google Search Console: If you haven’t already, sign up and verify your website with Google Search Console.
- Navigate to the Pages Report: In the GSC dashboard, look for the Pages (or Indexing > Pages) section in the left-hand menu.
- Identify “Not Found (404)” Errors: Scroll down to the “Why pages aren’t indexed” section. You’ll see various reasons, including “Not found (404).” Click on this to see a list of URLs that Google tried to crawl but couldn’t find.
- Review the List: GSC will show you the exact URLs that returned a 404 error. This list is gold; it tells you which links need your attention. Pay close attention to internal links, as these are within your control.
Best Practice: Google Search Console sometimes takes a while to update. Check it regularly, but don’t expect instant changes after you fix something.
Method 2: WordPress Plugins (Easiest for WordPress Users)
For WordPress website owners, plugins offer an incredibly convenient way to scan your entire site for broken links.
-
Install the Broken Link Checker Plugin:
- Navigate to your WordPress dashboard.
- Go to Plugins > Add New.
- Search for “Broken Link Checker“.
- Click Install Now and then Activate.
-
Configure and Run the Scan:
- Once activated, the plugin will typically start scanning your site automatically. You can monitor its progress by going to Tools > Broken Links.
- The plugin will display a list of all detected broken links, including internal and external links. It shows the status code (e.g., 404), the source of the link, and the text that contains the link.
- Review and Act:
- The plugin provides options directly within its interface to
Edit URL,Unlink(remove the link),Dismiss(if it’s a false positive or temporary issue), orRecheck.
- The plugin provides options directly within its interface to
Warning: The Broken Link Checker plugin, while powerful, can be resource-intensive, especially on larger sites. It constantly scans your site. I recommend activating it to run a scan, addressing the issues, and then deactivating it once done to free up server resources. Reactivate it periodically for checks.
Method 3: Online Broken Link Checkers
Several online tools can scan your website without installing anything. These are great for a quick check or for sites not on WordPress.
- Ahrefs Webmaster Tools: Offers a free version for verified site owners, providing a comprehensive site audit, including broken links.
- SEMrush Site Audit: Similar to Ahrefs, SEMrush offers a site audit feature that identifies broken links.
- Screaming Frog SEO Spider: A desktop application (free for up to 500 URLs) that crawls your site like a search engine, reporting on all links, redirects, and errors. More technical but very thorough.
Method 4: Manual Checking (For Smaller Sites or Specific Pages)
For very small websites or when you suspect a broken link on a specific page, a manual check can be effective:
- Click Every Link: Go through your pages and click every link. Yes, it’s tedious, but it’s foolproof for small sites.
- Use Browser Extensions: Extensions like LinkMiner or Check My Links for Chrome can quickly highlight broken links on the page you are currently viewing.
Step 2: How to Fix Broken Links on Your Website
Once you’ve identified the broken links, it’s time to fix them. The solution depends on why the link is broken. Here are the most common approaches:
Fix 1: Update the Link
This is the simplest fix. If the content you were linking to still exists but has moved to a new URL, simply update the link to point to the correct location.
How to do it (WordPress):
- Locate the Broken Link: Use the information from Google Search Console or the Broken Link Checker plugin to find the specific post, page, or widget containing the broken link.
- Edit the Content:
- Go to Posts > All Posts or Pages > All Pages in your WordPress dashboard.
- Find the relevant content and click Edit.
- In the editor (Gutenberg block editor or classic editor), highlight the broken link text.
- Click the Link icon (usually a chain symbol).
- Paste the correct, new URL in the link field.
- Click the Apply button (or update icon).
- Update the Post/Page: Click the Update button to save your changes.
This method is ideal for internal links that might have changed during a site restructuring or for external links where the target site moved its content.
Fix 2: Remove the Link
If the linked-to content no longer exists anywhere and there’s no suitable alternative, the best course of action is to simply remove the link.
How to do it (WordPress):
- Locate and Edit: Similar to updating, navigate to the post, page, or widget.
- Remove the Link:
- Highlight the broken link text.
- Click the Unlink icon (usually a broken chain symbol).
- The text will remain, but it will no longer be a hyperlink.
- Update the Post/Page: Save your changes.
Sometimes, a link might be in a menu. To fix this:
- Go to Appearance > Menus.
- Find the menu item with the broken link.
- Click the down arrow to expand it.
- Update the URL or remove the menu item entirely.
Fix 3: Implement a 301 Redirect (Permanent Move)
This is often the most important and effective fix, especially for links that have been broken for a while and might have been indexed by search engines or linked to by other sites. A 301 redirect tells browsers and search engines that a page has permanently moved to a new location. It automatically sends visitors and search engine bots from the old, broken URL to a new, working URL. This preserves “link equity” or “SEO juice.”
Option A: Using a WordPress Plugin (Recommended for Beginners)
Plugins make managing 301 redirects straightforward.
-
Install a Redirect Plugin:
- Redirection: A popular, free, and robust plugin specifically for managing redirects.
- Rank Math or Yoast SEO: Both premium versions of these SEO plugins include powerful redirect managers. If you’re already using one of these, leverage its built-in functionality.
- For this example, let’s assume you’re using Redirection.
- Go to Plugins > Add New, search for “Redirection,” Install and Activate.
-
Set Up the Redirect:
- Navigate to Tools > Redirection in your WordPress dashboard.
- You’ll see a section to add new redirects.
- Source URL: Enter the full broken URL (e.g.,
/old-broken-page/). Do NOT include your domain name unless the plugin specifies it. - Target URL: Enter the full, correct URL you want visitors to go to (e.g.,
https://yourwebsite.com/new-working-page/). - Ensure the “Type” is set to
301 - Moved Permanently. - Click Add Redirect.
Best Practice: When redirecting, try to send users to the most relevant existing page. If there’s no directly relevant page, redirect them to a category page or even your homepage as a last resort, but always aim for relevance.
Option B: Editing Your .htaccess File (Advanced Users)
The .htaccess file is a powerful configuration file used by Apache web servers (the most common type for shared hosting). You can add 301 redirects directly to this file, which is processed before WordPress even loads. This method is highly efficient but requires extreme caution.
Warning: Incorrect edits to your
.htaccessfile can break your entire website, making it inaccessible. Always back up your.htaccessfile before making changes.
-
Access Your
.htaccessFile:- You’ll need to connect to your website via FTP (FileZilla is a popular client) or use your hosting provider’s file manager (often found in cPanel or Plesk).
- The
.htaccessfile is usually located in the root directory of your WordPress installation (wherewp-config.phpandwp-adminfolders are). - Download a copy of the existing
.htaccessfile as a backup.
-
Add the Redirect Rule:
- Open the
.htaccessfile with a plain text editor. - Add the following line above the
# BEGIN WordPresssection:
Redirect 301 /old-broken-page/ https://yourwebsite.com/new-working-page/- Replace
/old-broken-page/with the relative path of your broken link andhttps://yourwebsite.com/new-working-page/with the full URL of the new page. - For example:
Redirect 301 /services/old-service.html https://yourwebsite.com/services/new-service/
- Open the
-
Save and Upload: Save the modified
.htaccessfile and upload it back to your server, overwriting the old one. -
Test Thoroughly: Immediately test the old URL in your browser to ensure the redirect works and your site hasn’t broken.
Option C: Conditional Redirects via functions.php (Very Advanced)
For highly specific or conditional redirects (e.g., redirecting all URLs with a certain string, or based on user roles), you can use PHP within your theme’s functions.php file. This is less common for simple broken links but demonstrates the power of custom code.
Warning: Editing
functions.phpdirectly can also break your site. Use a child theme or a custom snippets plugin to avoid losing changes during theme updates and to isolate potential issues.
<?php
// Place this code in your child theme's functions.php file or a custom snippets plugin
function askbytewise_custom_redirect_broken_link() {
    // Check if it's a 404 error and the requested URI matches a specific broken path
    if ( is_404() && strpos( $_SERVER['REQUEST_URI'], '/product-category-old/' ) !== false ) {
        // Redirect to a new, relevant page
        wp_redirect( 'https://yourwebsite.com/products/new-category/', 301 );
        exit(); // Always exit after a redirect
    }
    // You can add more conditional redirects here
    if ( is_404() && strpos( $_SERVER['REQUEST_URI'], '/obsolete-blog-post/' ) !== false ) {
        wp_redirect( 'https://yourwebsite.com/blog/', 301 ); // Redirect to blog homepage
        exit();
    }
}
add_action( 'template_redirect', 'askbytewise_custom_redirect_broken_link' );
?>
This PHP snippet checks if the current page is a 404 error and if the requested URL contains a specific string. If it does, it performs a 301 redirect. This gives you granular control but requires a good understanding of PHP and WordPress hooks.
Fix 4: Manage External Broken Links
While you can’t fix a broken link on another website, you can control how your site handles links to external broken pages.
- Remove or Update: If you find an external broken link on your site (e.g., linking to an article on another blog that no longer exists), either remove the link entirely or find a new, working source to link to.
- Contact the Site Owner: If the external site is important, you could try contacting their webmaster to let them know about their broken page. They might fix it or provide you with an updated URL.
Step 3: Preventing Future Broken Links
An ounce of prevention is worth a pound of cure!
- Regular Audits: Schedule periodic checks (monthly or quarterly) using Google Search Console, a plugin like Broken Link Checker, or an online tool.
- Careful Content Management:
- Before Deleting: If you delete a page or post, always consider if any existing internal or external links point to it. Set up a 301 redirect before deleting, if possible.
- Renaming URLs: If you change a post’s or page’s permalink, ensure you set up a redirect from the old URL to the new one immediately. Many modern WordPress SEO plugins (like Rank Math or Yoast SEO) will prompt you to do this automatically.
- Vetting External Links: When linking to external resources, choose reputable, stable sources.
- Check Internal Links: Whenever you publish new content or update old content, take a moment to check that your internal links are pointing to the correct places.
Troubleshooting Common Broken Link Issues
Even with the best tools, you might encounter some specific challenges.
Issue 1: Broken Link Checker Plugin Reports False Positives
Sometimes, the plugin might report a link as broken when it’s actually working. This can happen due to:
- Server Overload: Your server might be slow to respond to the plugin’s requests.
- Firewall/Security Rules: Security plugins or server firewalls might block the plugin’s requests.
- Temporary Network Issues: Intermittent internet problems.
Solution:
- Recheck the Link: Manually click the link or use an online tool to verify its status.
- Dismiss: If you’re certain the link is working, you can “Dismiss” it in the plugin’s interface.
- Adjust Plugin Settings: In Tools > Broken Links > Settings, you can increase the timeout period for link checks or limit the number of checks per hour to reduce server load.
Issue 2: My Website Has Hundreds of Broken Links! Where Do I Start?
A common scenario after migrating a site or if maintenance has been neglected.
Solution:
- Prioritize: Focus on internal links first, as these are entirely within your control and have the most direct impact on your SEO and user experience.
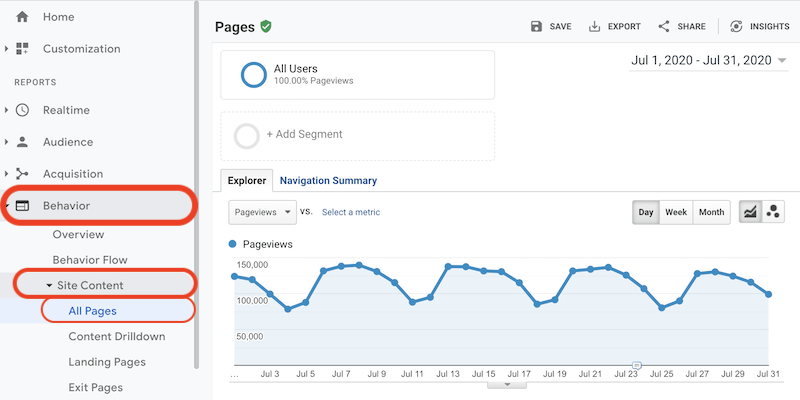
- Most Visited Pages: Use Google Analytics or your website’s analytics to identify your most popular pages. Fix broken links on these pages first.
- Sitemap Review: Check your XML sitemap in Google Search Console. Any 404s listed there are high-priority.
- Batch Redirects: If an entire section of your site moved (e.g.,
/old-category/*to/new-category/*), you might be able to implement a single regular expression redirect using a plugin like Redirection or in.htaccessto catch many broken links at once.
Issue 3: Redirect Loops
A redirect loop occurs when URL A redirects to URL B, and URL B (or another URL in the chain) redirects back to URL A, creating an endless cycle. Browsers will eventually give up and display an error.
Solution:
- Careful Planning: When creating redirects, always double-check the source and target URLs.
- Test Immediately: After creating a redirect (especially in
.htaccess), test it with the old URL and then the new URL. - Use a Tool: Browser extensions like Redirect Path can help you visualize the redirect chain and identify where the loop occurs.
- Check
.htaccess: If you’re using.htaccess, ensure there are no conflicting rules. Rules are processed in order, so a general rule might override a more specific one.
Conclusion: A Smooth Path to a Better Website
Congratulations! You now have a comprehensive understanding of how to find and fix broken links on your website. By diligently following these steps, you’re not just eliminating annoying 404 errors; you’re actively improving your website’s user experience, boosting its SEO, and strengthening its overall authority. Regular maintenance in this area is a small effort that yields significant, long-term benefits.
Remember, a well-maintained website is a welcoming website, and that’s exactly what AskByteWise.com aims to help you create. Keep your links healthy, and your website will thrive!
Next Steps:
- Schedule Regular Audits: Mark your calendar for monthly or quarterly broken link checks.
- Monitor Google Search Console: Keep an eye on the “Not found (404)” report.
- Review Your Content Strategy: When creating or updating content, make link management an integral part of your process.
Frequently Asked Questions (FAQ)
Q1: How often should I check for broken links on my website?
For active websites, I recommend checking at least monthly. For smaller sites with infrequent updates, quarterly might suffice. If you’ve just done a major site migration, redesign, or deleted a lot of content, check immediately and then more frequently for a few weeks.
Q2: Do external broken links (links from my site to others) matter as much as internal ones?
Internal broken links are generally more critical because they directly impact your user experience and SEO within your own site. However, external broken links still matter. They can hurt user trust, make your content seem outdated, and can be seen as a sign of neglect by search engines. It’s always best to fix or remove them.
Q3: Can broken links really hurt my SEO?
Absolutely. While a few isolated 404s won’t tank your site, a significant number of broken links can severely impact your SEO. They signal to search engines that your site is poorly maintained, waste crawl budget, and can prevent “link equity” from flowing through your site, ultimately hurting your rankings and visibility.
Q4: What’s the difference between a 301 and a 302 redirect?
- 301 Redirect (Moved Permanently): This tells search engines that a page has permanently moved to a new location. It passes almost all of the “link equity” (SEO value) from the old URL to the new one. Use this for permanent changes like deleting content or changing permalinks.
- 302 Redirect (Found/Moved Temporarily): This indicates a temporary move. It passes little to no link equity. Use this for situations like A/B testing, seasonal promotions, or temporary maintenance pages where you intend for the original page to return to its URL. For fixing broken links, always use a 301 redirect.
Q5: I used the Broken Link Checker plugin, and it found hundreds of broken links. What’s the fastest way to deal with this?
Prioritize!
- Start with internal links. These are most impactful for your site.
- Look for patterns. Did you rename a category? Move a specific section of your site? You might be able to create a single regular expression (regex) 301 redirect to fix many at once. For example, redirecting
/old-category/(.*)to/new-category/$1. - Focus on high-traffic pages. Use Google Analytics to see which of your pages get the most visitors and fix links on those first.
- Batch remove/unlink. If many broken links point to truly defunct external sources or very old content you no longer care about, it might be quicker to unlink them in batches within the plugin interface or remove them entirely.
Remember to deactivate the plugin after you’re done to save server resources.
See more: How to Find and Fix Broken Links on Your Website.
Discover: AskByteWise.